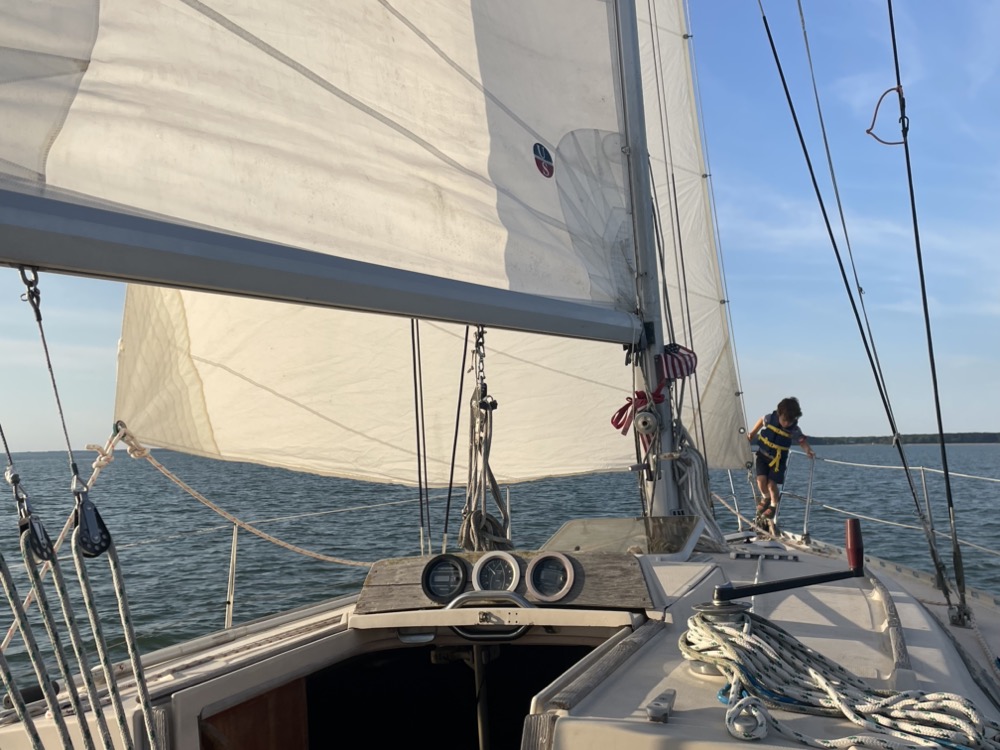
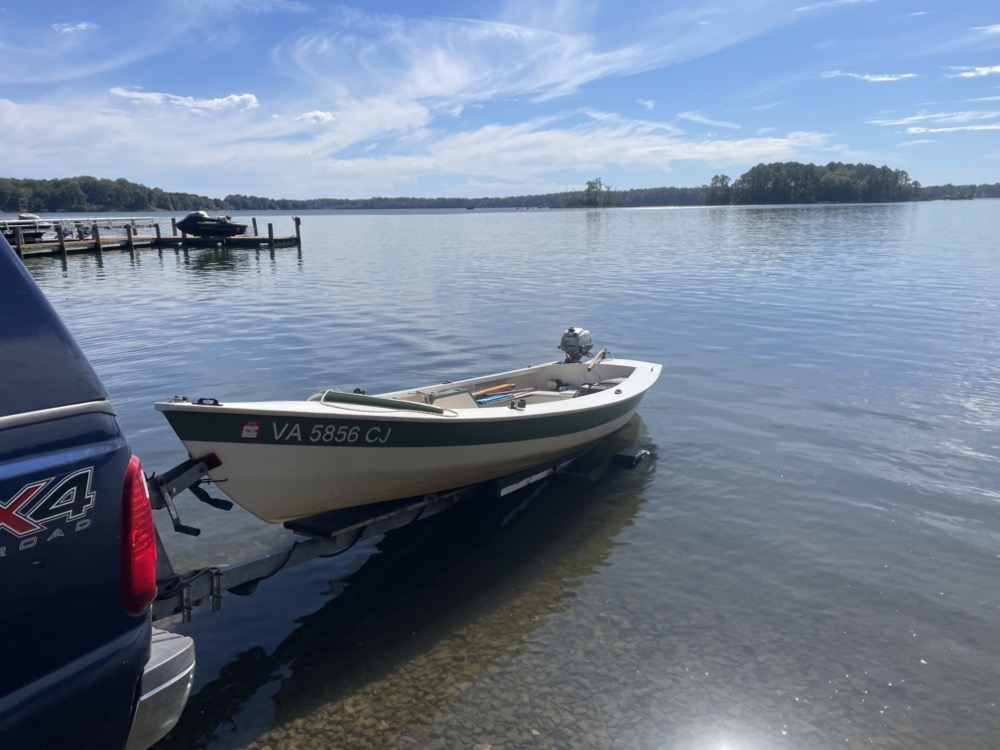
A coworker recently bought a Beneteau First 35 so my wife, son, and I joined him and his wife one day after work and spent four hours tacking back and forth across the Rappahannock river. We launched from Urbanna and made 3 laps for about 14 miles. The wind was pretty light the whole time, but it was great to be out on the water.
I’m not sure my son sat down for longer than 30 seconds the entire trip. He explored from the bow pulpit to halfway up the bimini frame and every inch down below. Towards the end he made a game where he would jump off the port side cabin roof, grab the traveller on the way down, and swing around to the starboard cockpit side. He must have did that 20 times in a row.
It was an all around beautiful afternoon and it was dark by the time was made it back to the dock. I steered for two of the three laps and motored us back into the marina. I enjoyed the boat, although it was wildly different than my small boating experience.
My wife and son went up to her folks for Memorial Day weekend and are staying for a summer camp afterward. So that means a ton of free time and I was really conflicted between boat building or trying to go on a multi day cruise in my First Mate. I don’t think I went sailing at all last year but I also really want to get Long Steps finished. In the end the weather made the decision for me by dumping nearly 3″ of rain on us.
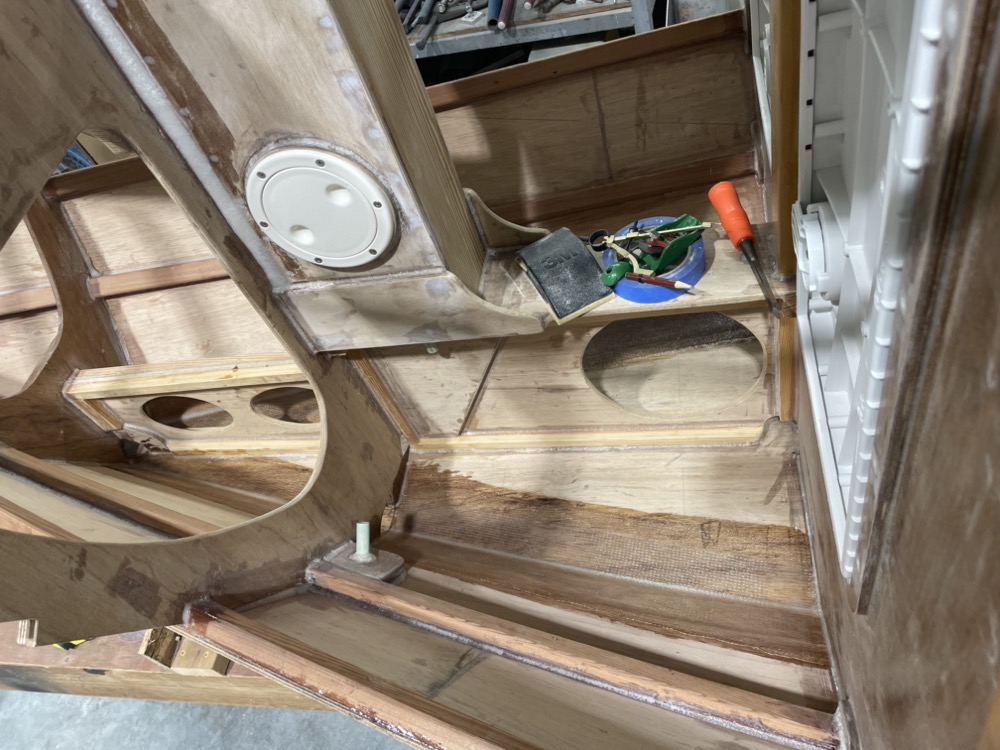
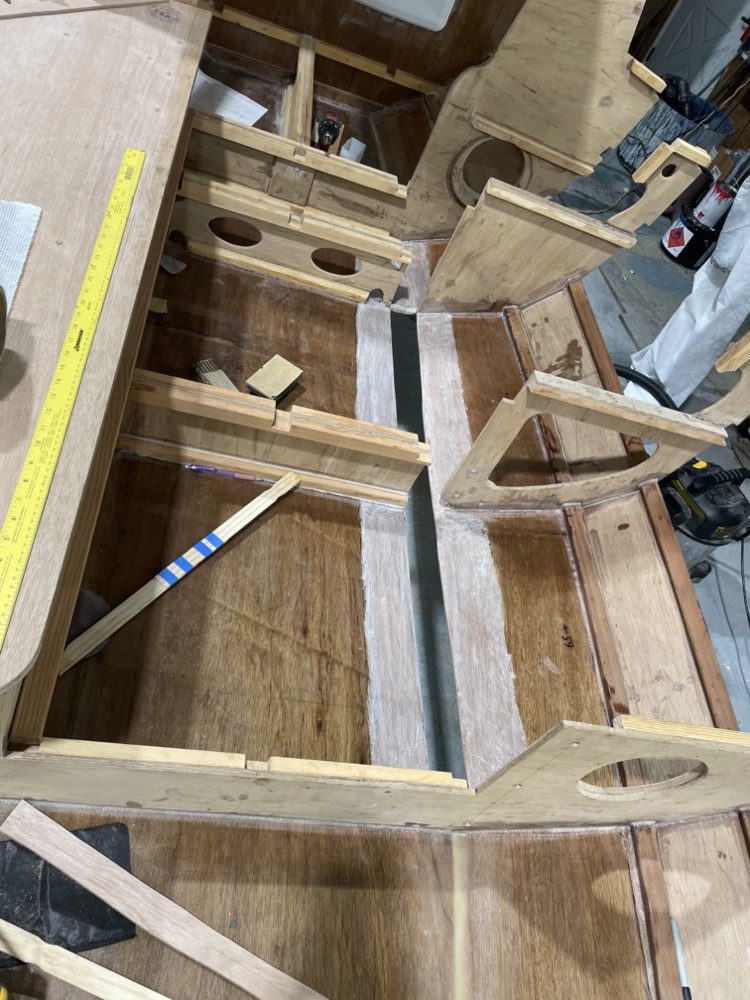
I started by finishing off the water ballast tank with Pettit Protect. I applied the first coat to tacky epoxy and it can be reapplied to itself up to 60 days later without sanding. It really reduces labor. In the back corner is a PVC drop tube that goes through the seat front and over to the pump system. There will also be a drain plug nearby in the future that I’ll install through an inspection hatch. I figure the pump will get rid of the majority of the water and the drain plug can get the rest. It’ll be offset so I can put one wheel of the trailer on a 2x to move the water to the corner.
Next I glued the ballast tank lid down. I’m going to keep the next section of flooring removable for a footwell since it really helps with ergonomics. I feel like it needs limber holes but I haven’t quite figured out what I want to do yet. Water in the open area will want to drain forward into the footwell, but when I’m heeled over I think it’ll get trapped on both sides of the bulkhead.
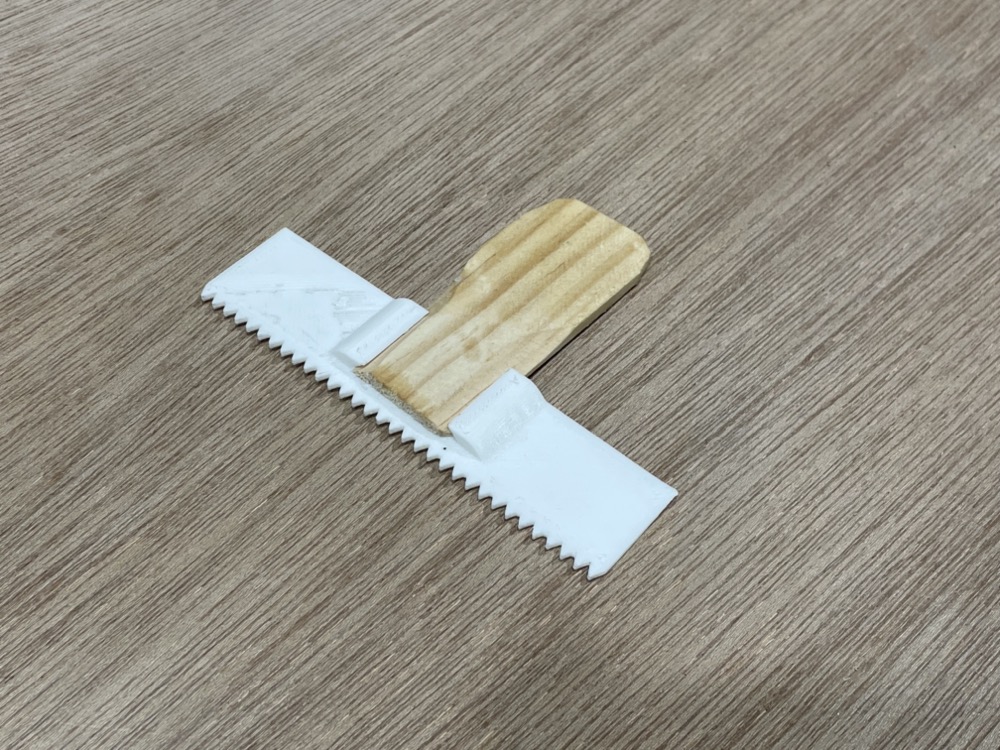
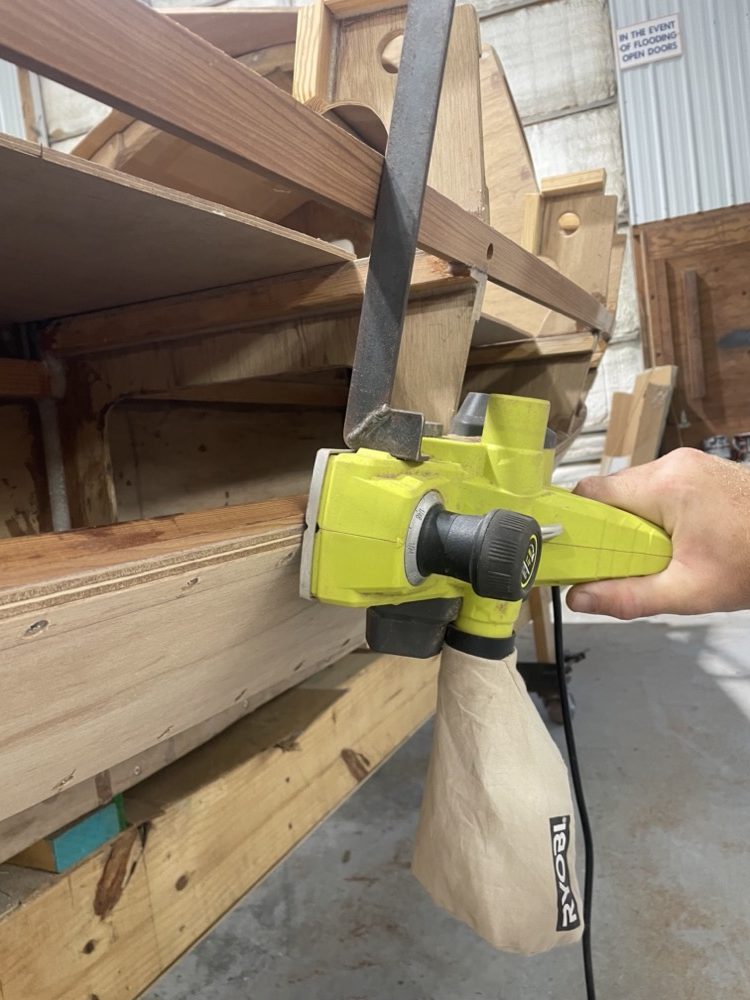
On big glue ups I like those 809 West System notched spreaders. However I don’t like paying for them so I designed my own and printed out a bunch with my 3d printer. 7 cents a pop! It has a female dovetail that takes a whittled down paint stirrer stick. I can extend the reach if I need to with a longer paint stick and the narrow sides lets me get into corners or under obstructions easily.
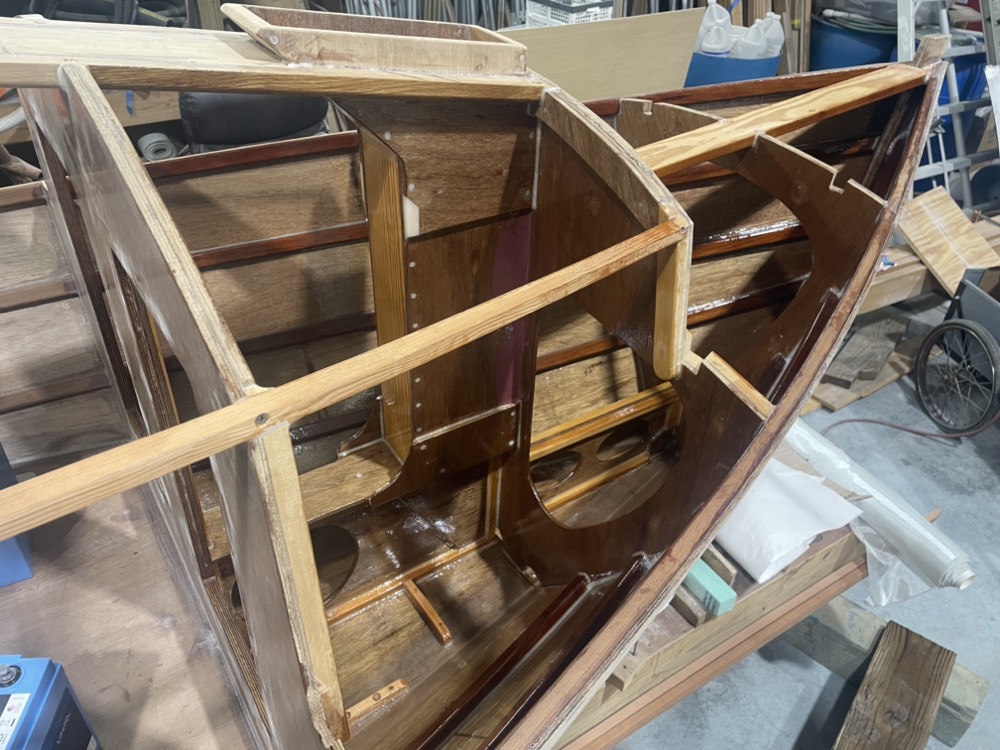
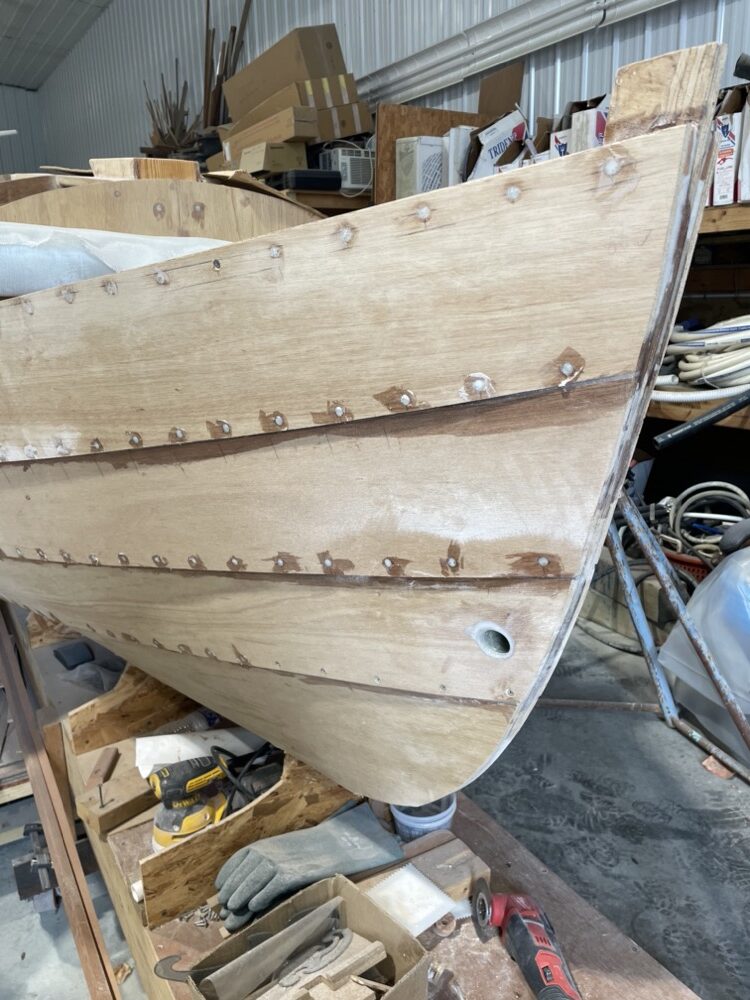
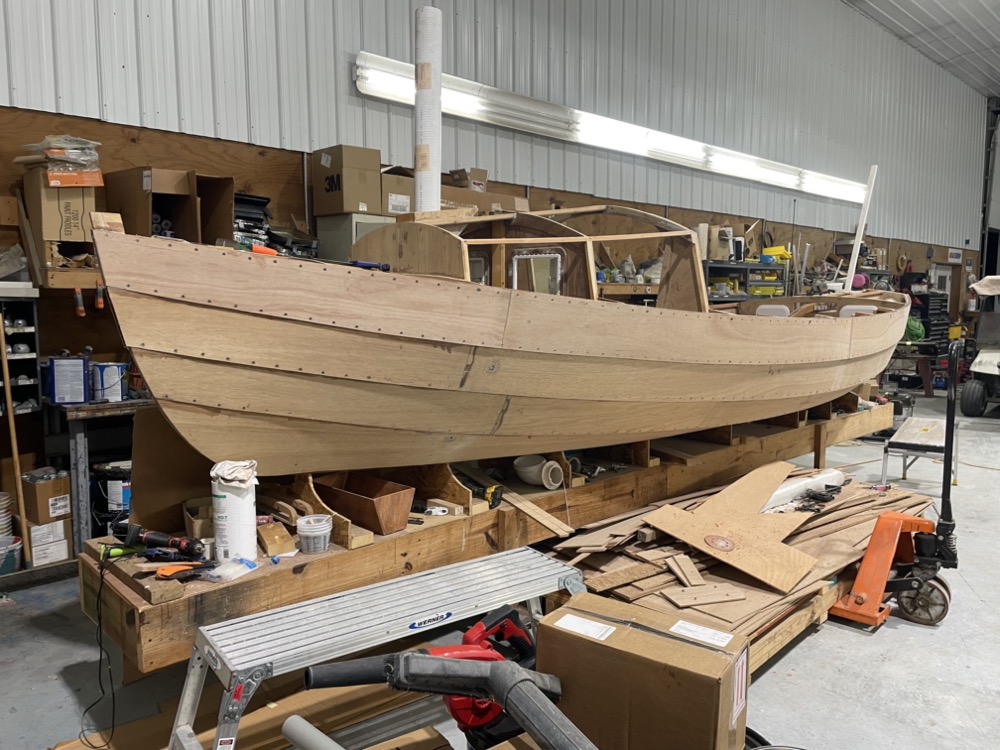
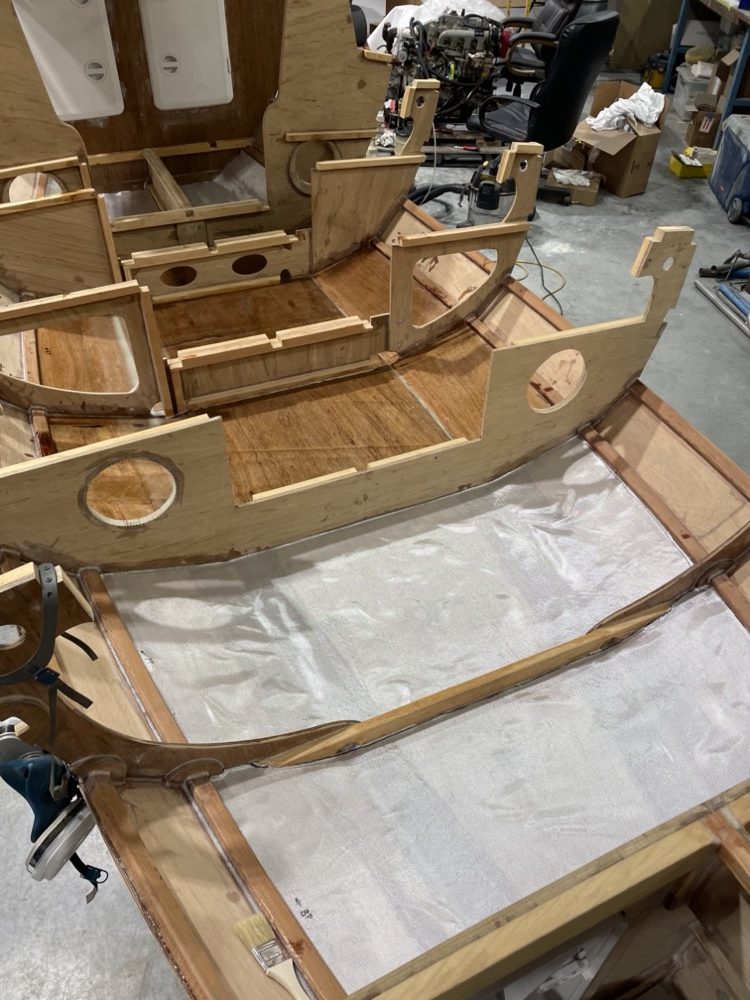
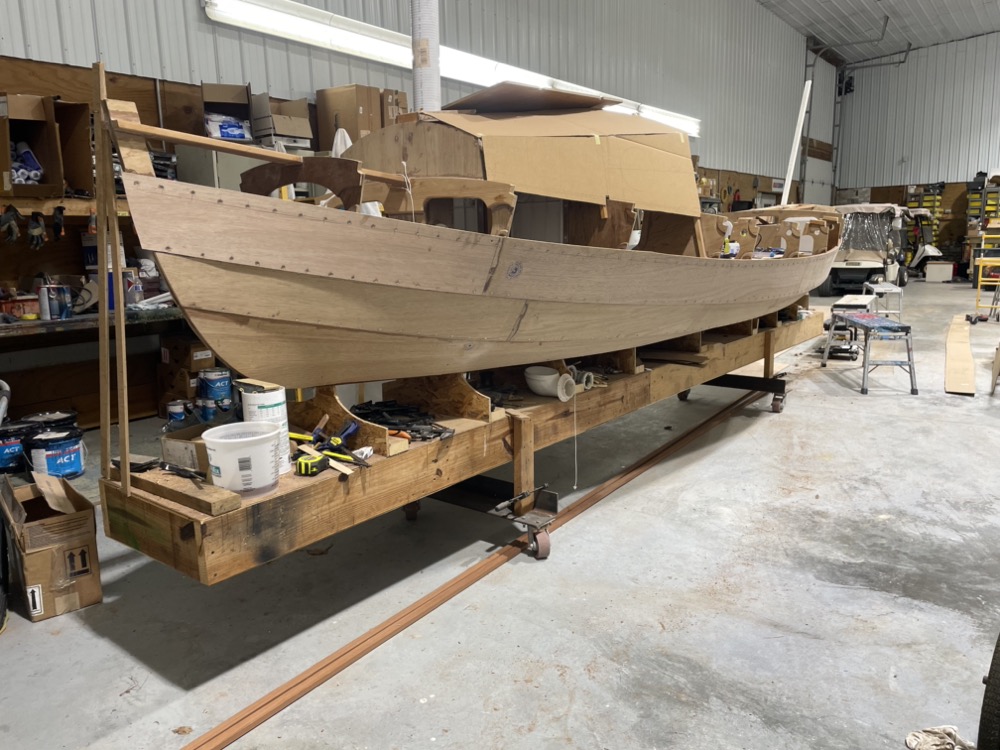
Well it’s finally time to pay for getting the planks installed before finishing the inside. In my defense, that was when I had another large block of time that seemed better suited to time consuming parts of the build. Anyway, somehow I got three coats of epoxy on without getting glued in. There’s some unnecessary fairing in places because it was leftover from other jobs and I originally planned to paint in here. Then I decided since there’s no UV why not just tint epoxy white to brighten it up? Then I decided to lower the bar even more and skip the tint.
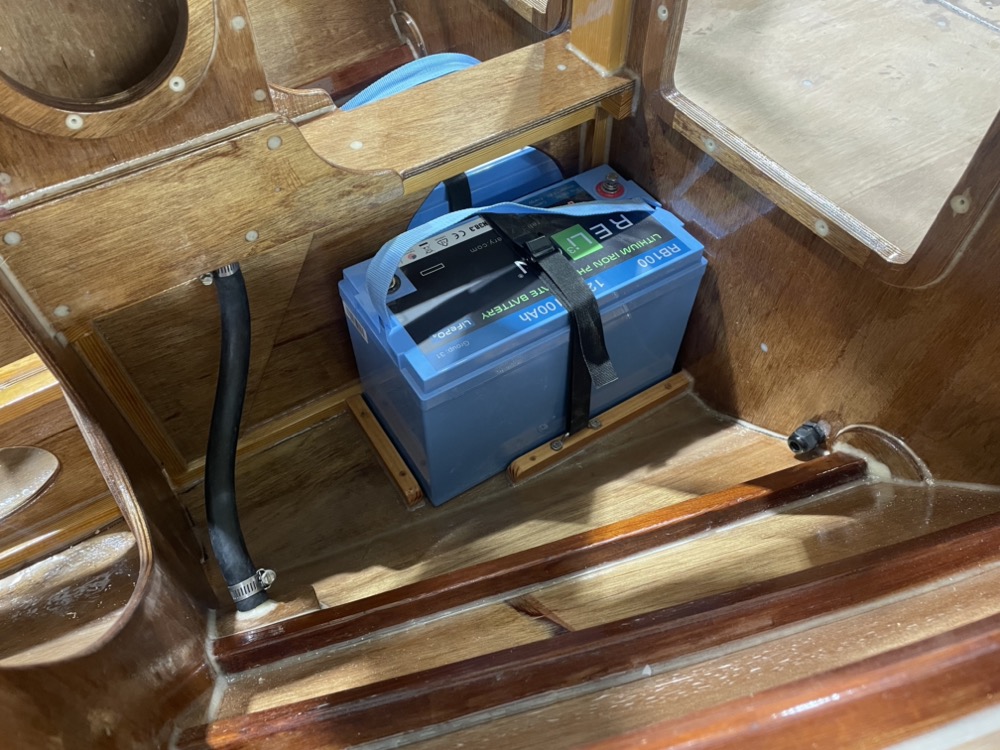
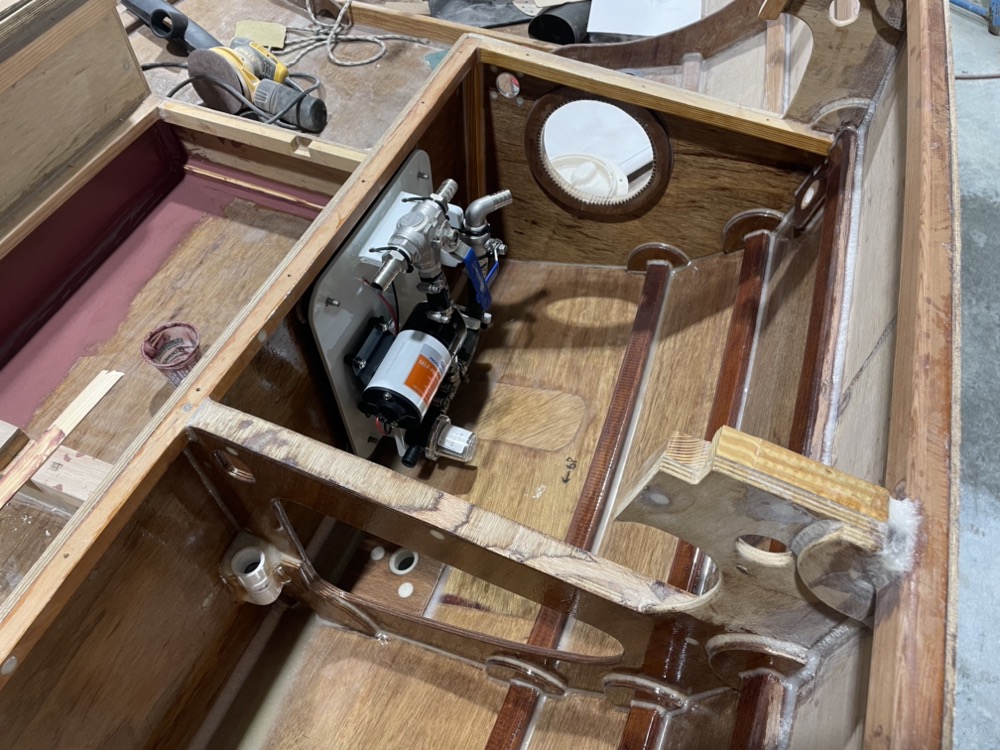
One of our customers must have something wrong with his electrical system since he goes through batteries just about every year. Anyway, a few weeks ago I saw him dumping off three 100Ah LiFePo4 batteries on our dead battery pallet. Two tested 13.3v and the other 0.3v and needless to say they pretty quickly found their way into my boat. I charged up the two good ones, glued some cleats to the hull, strapped them down and eventually they’ll be my 24v system. These things are like $900 new! I also ran a hose for the mast box drain and there’s a cable gland that leads back to the pump system. I haven’t quite figured out where all the electrical stuff is going to live, but it’s becoming more clear as I add stuff.
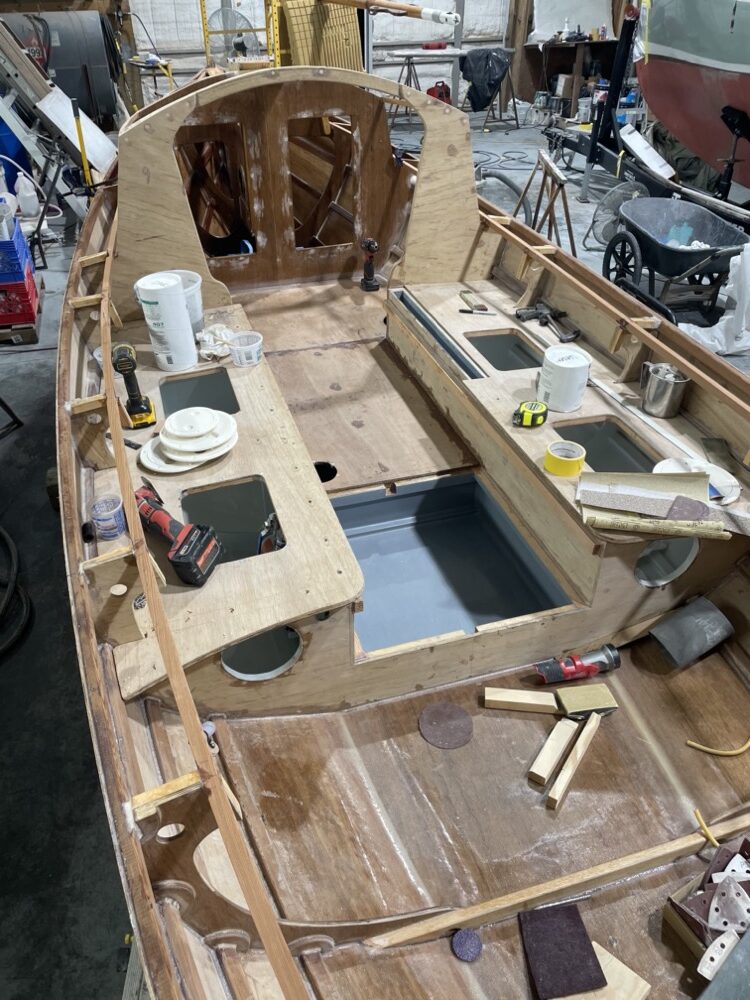
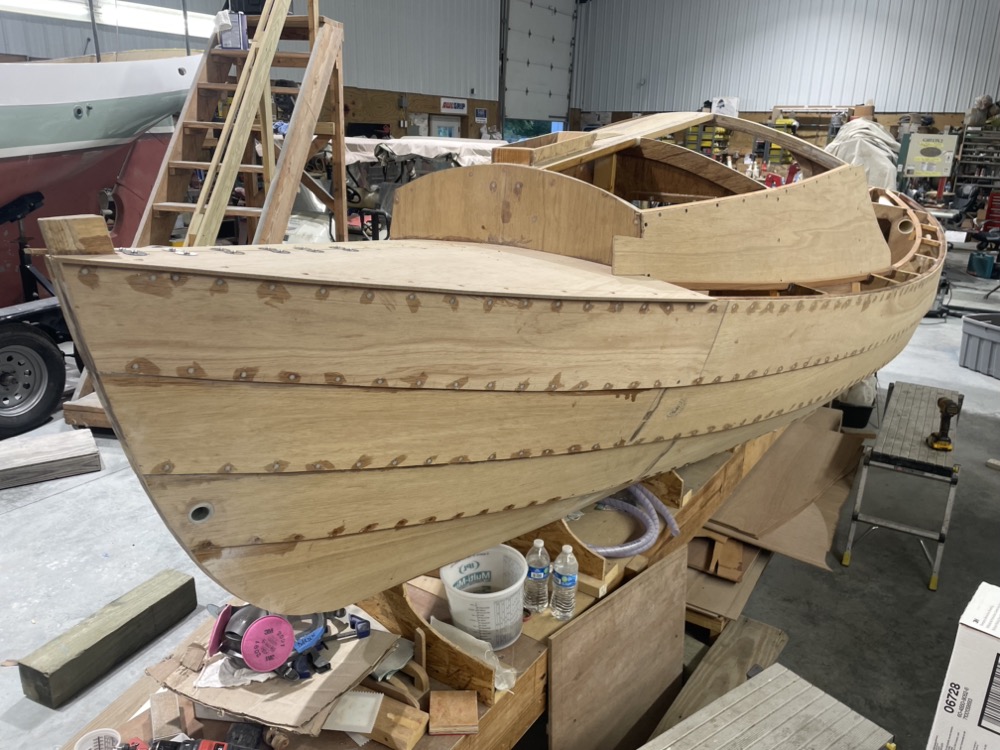
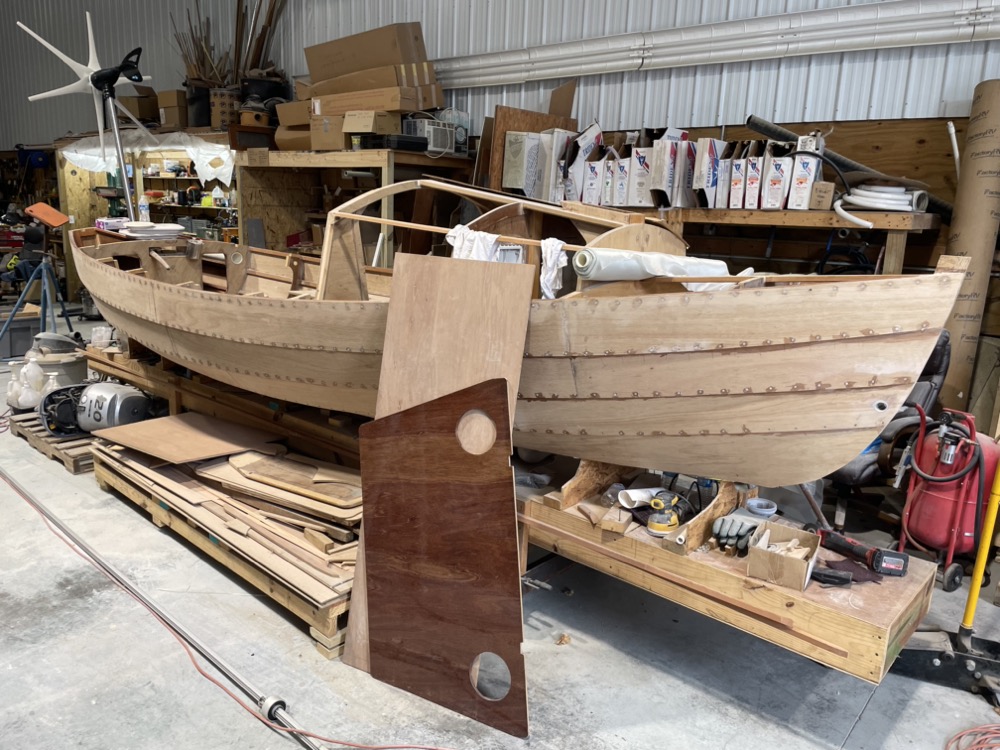
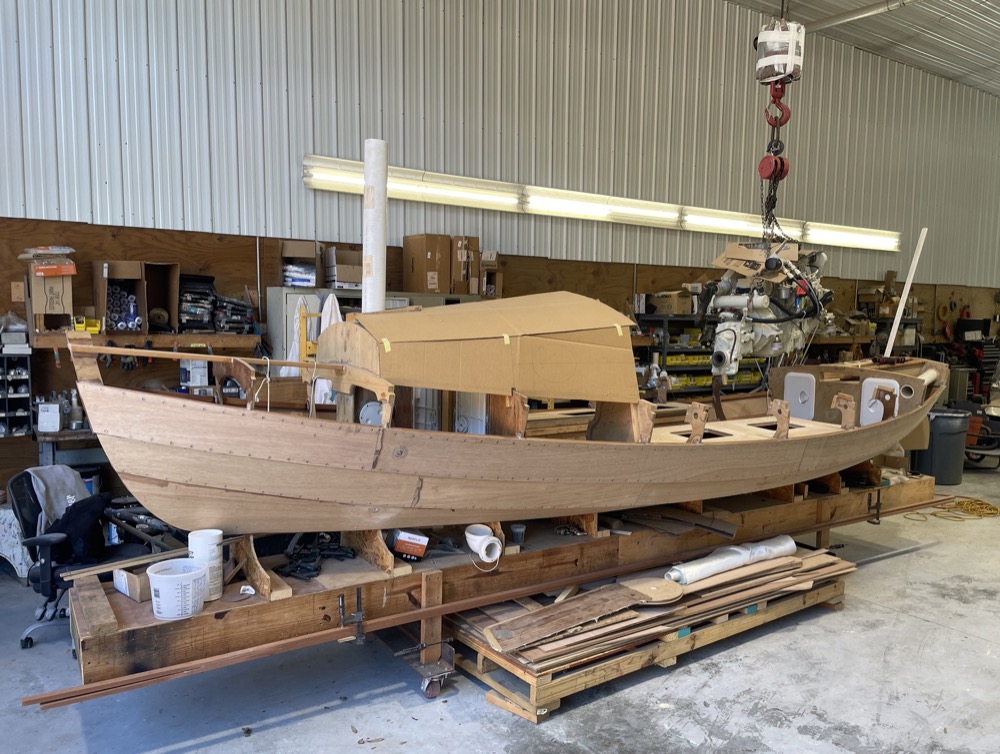
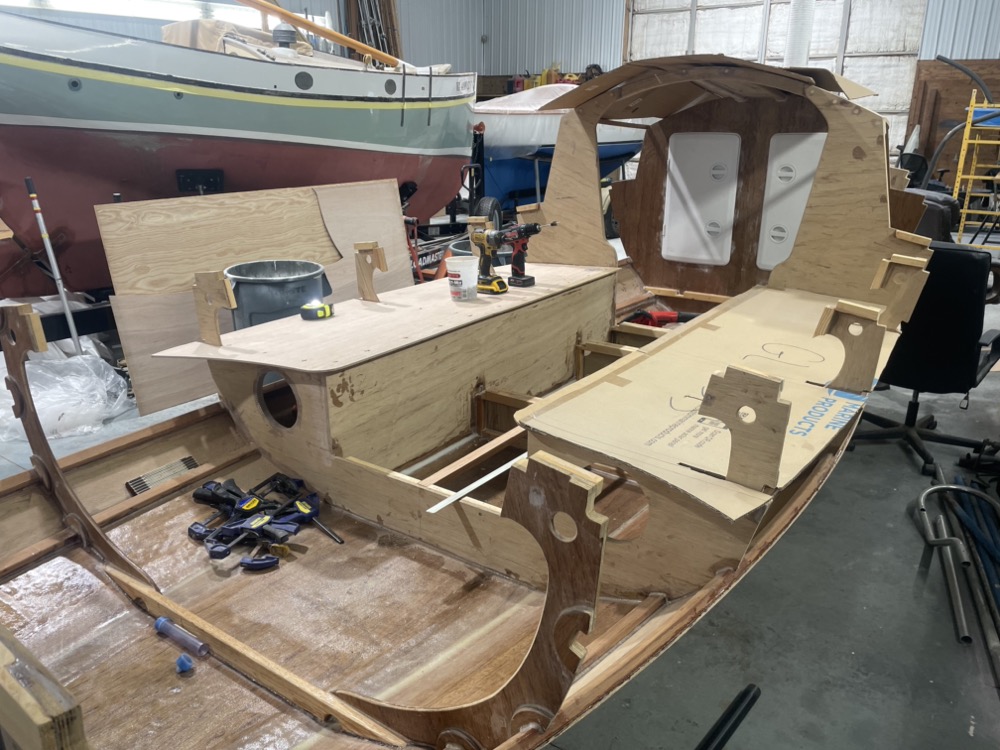
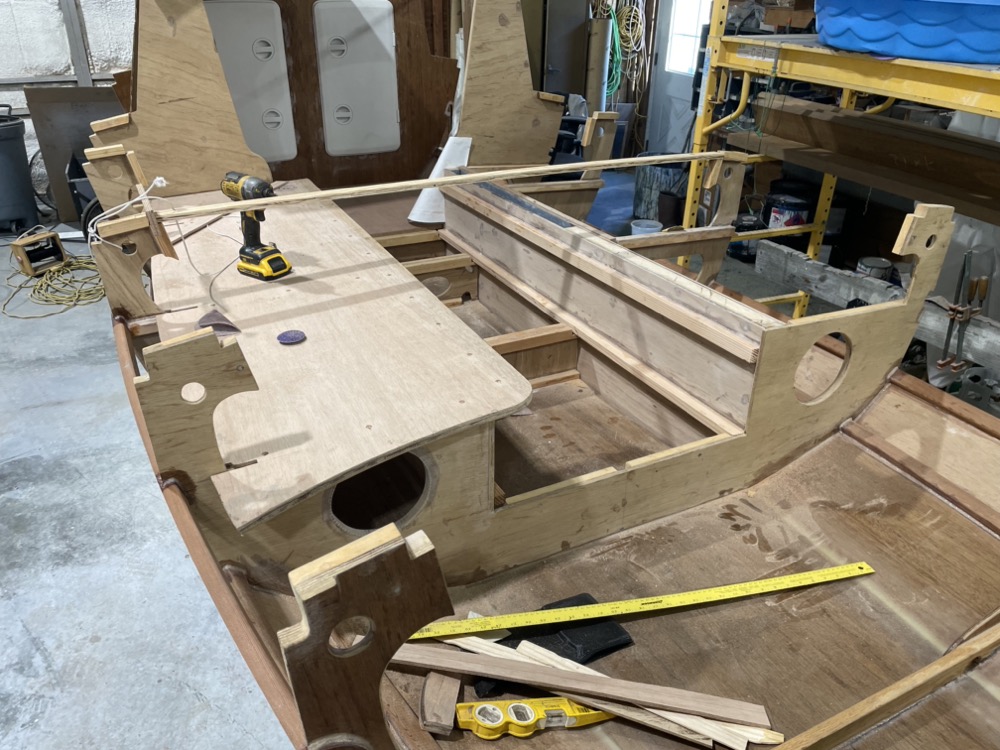
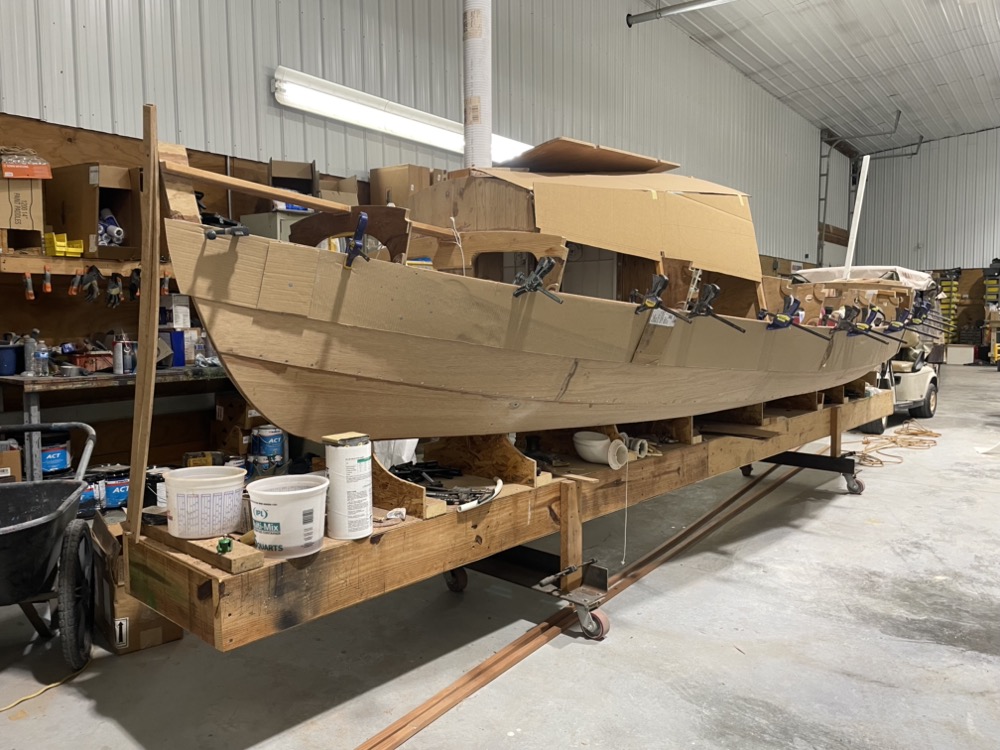
And here’s the latest progress. I’ve installed the deck carlins and started on deck/cabin/roof blanks. I think I’ll dry fit, coat the underside, and store them until I need them.
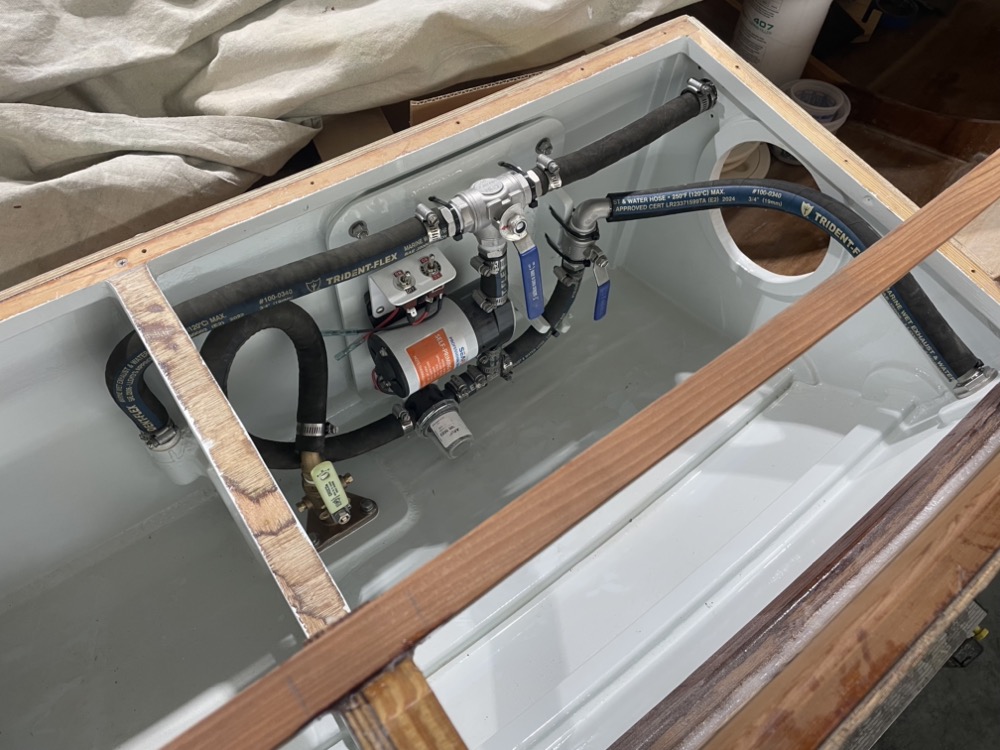
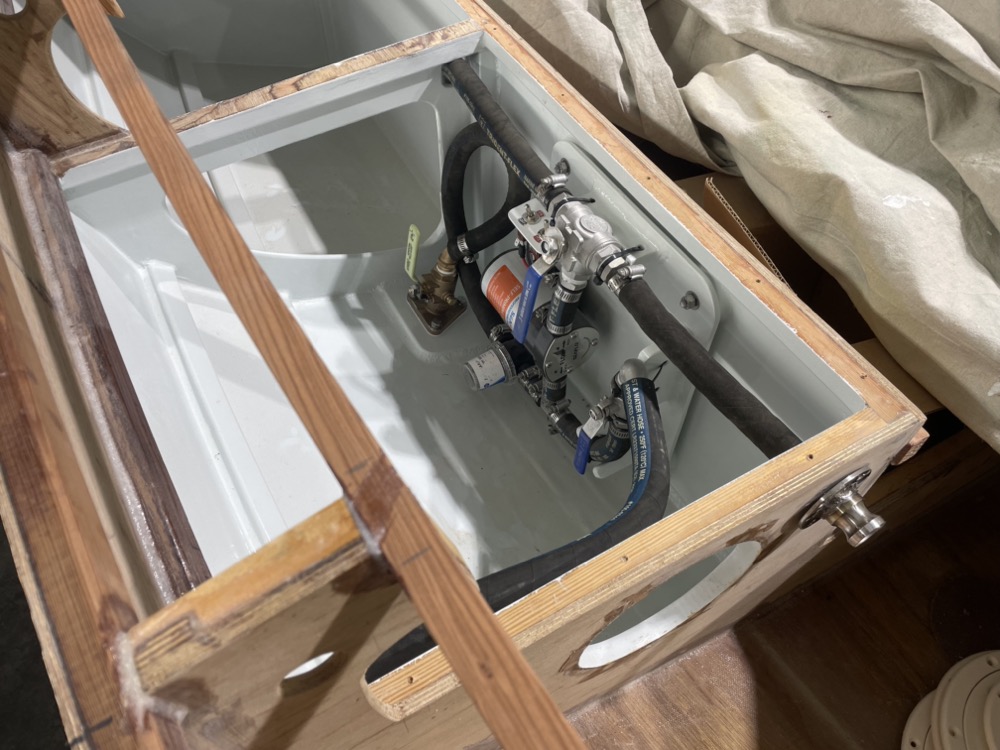
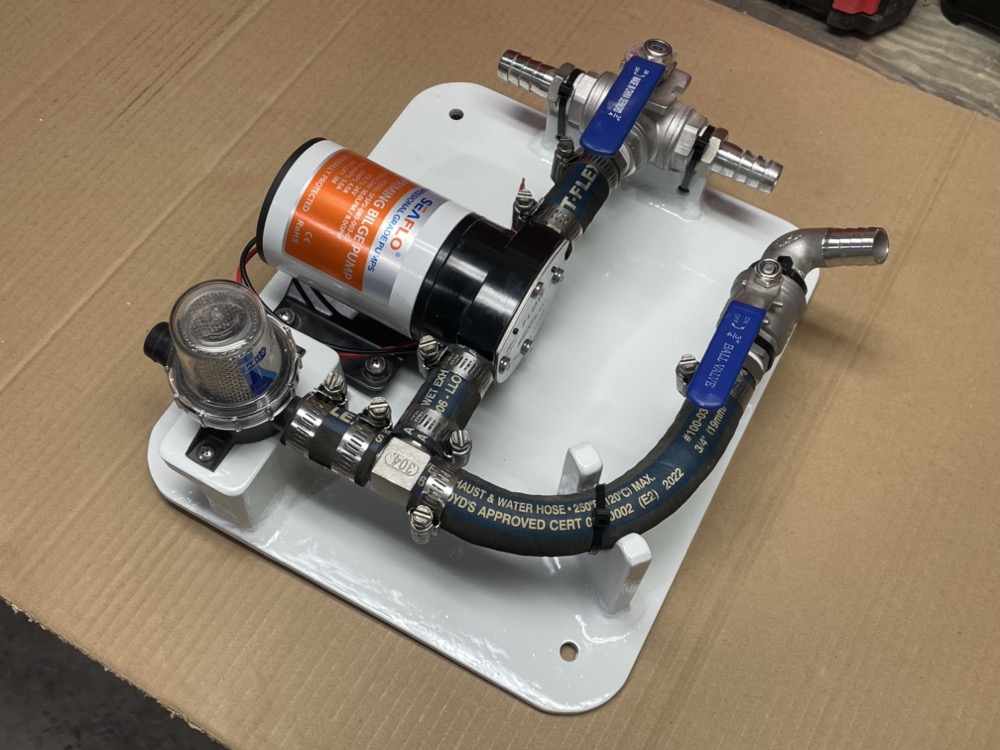
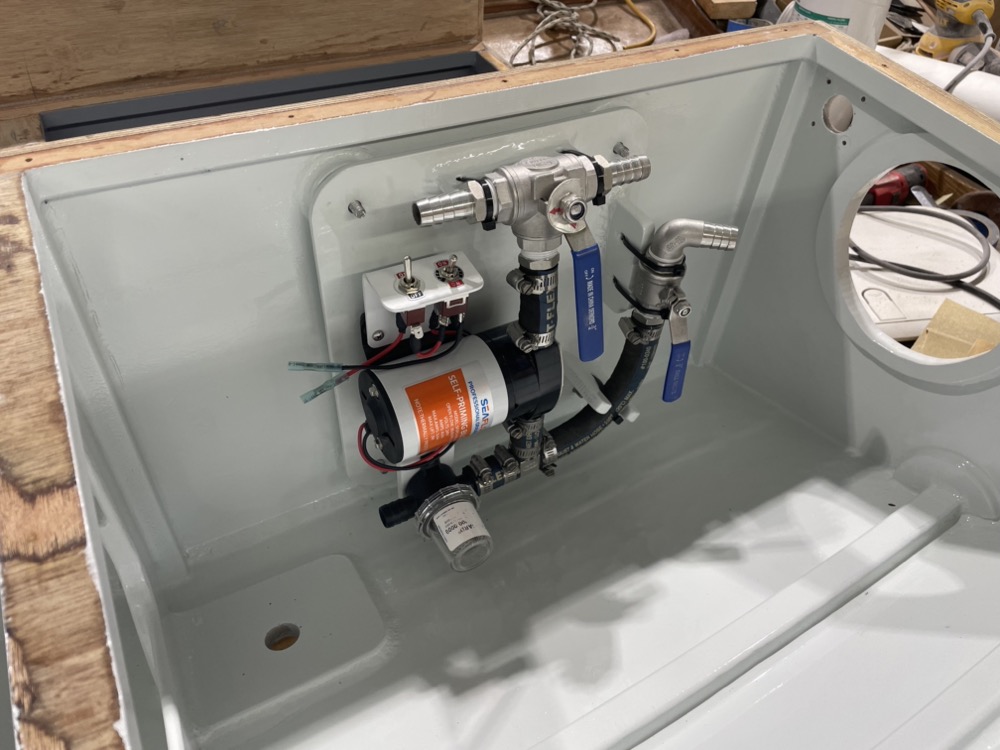
I got the pump setup installed and the hoses run or dry fit. I went with a 3/4″ Groco flange valve. Typically at work we install Apollo valves and I do think they’re higher quality. But I figure since the boat will live on a trailer 95% of the time and I’m going to flush the plumbing system out after each use Groco will be fine and it’s a physically smaller valve too.
Seawater comes up through the seacock, through a strainer, up to the pump, then left to the ballast tank or right to a cam lock fitting. By changing some valves and reversing the pump I can suck from the ballast tank or a hose on the cam lock fitting and divert it out through a through hull.
I ran wiring and tested the plumbing system so I’ll feel confident glueing the seat top on. It won’t be fun to work on in the future, but everything is accessable. I once removed and replaced a frozen seacock completely by feel while shoulder deep through a shoebox size hatch under a nav station desk.
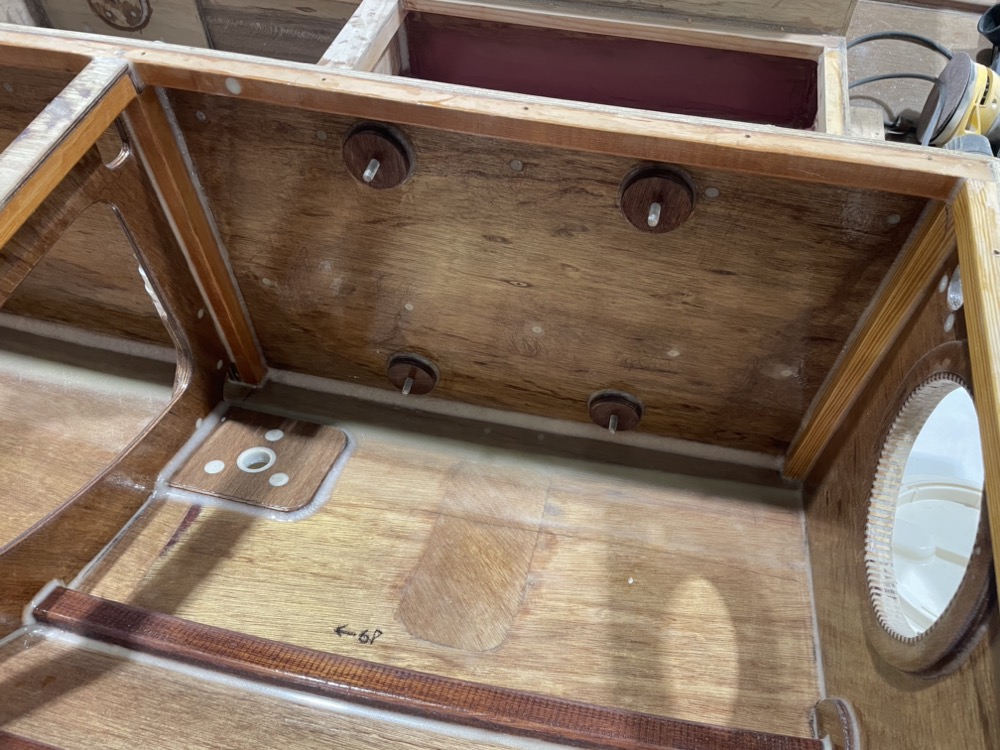
Here’s both seat tops installed. They’ve felt a little flimsy when dry fitting, but everything really stiffened up once they were epoxied down. Especially the back seam next to the hull.
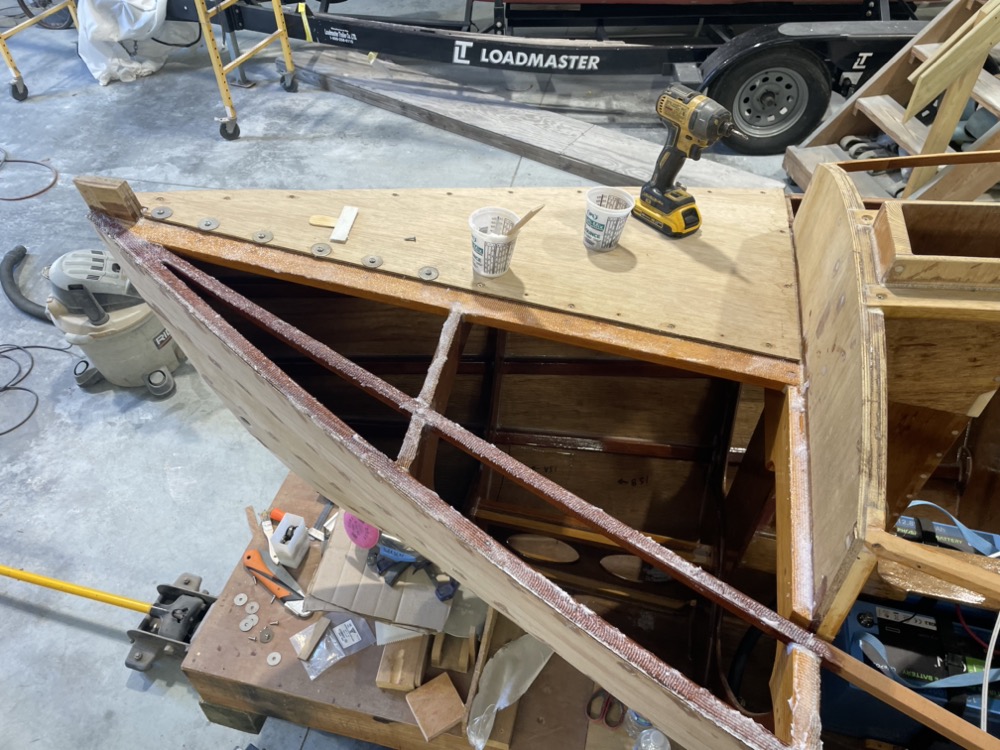
I also got the foredeck glued down after dry fitting and prepping the blanks with epoxy last weekend. The 1/4″ plywood will make the bend, but it really wants to lift the center seam and I needed fender washers to help hold it down. One piece might have worked better, but two pieces fit better on a sheet of plywood.
Next I started trimming the cabin side blank to fit over the deck and between the framing and deck carlin. I’ve gone back and forth on the decorative knee. Part of me wants to remove it since it will trap debris, but I think it really helps break up the slab sided front of the cabin. I think I’ll keep it and give it a generous limber hole.
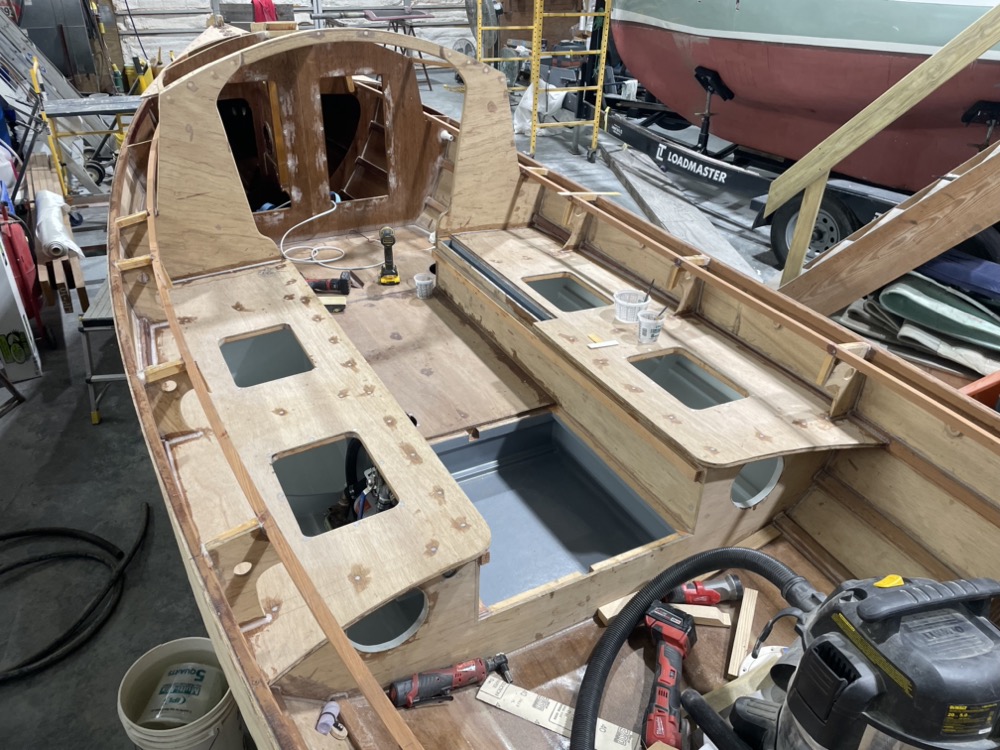
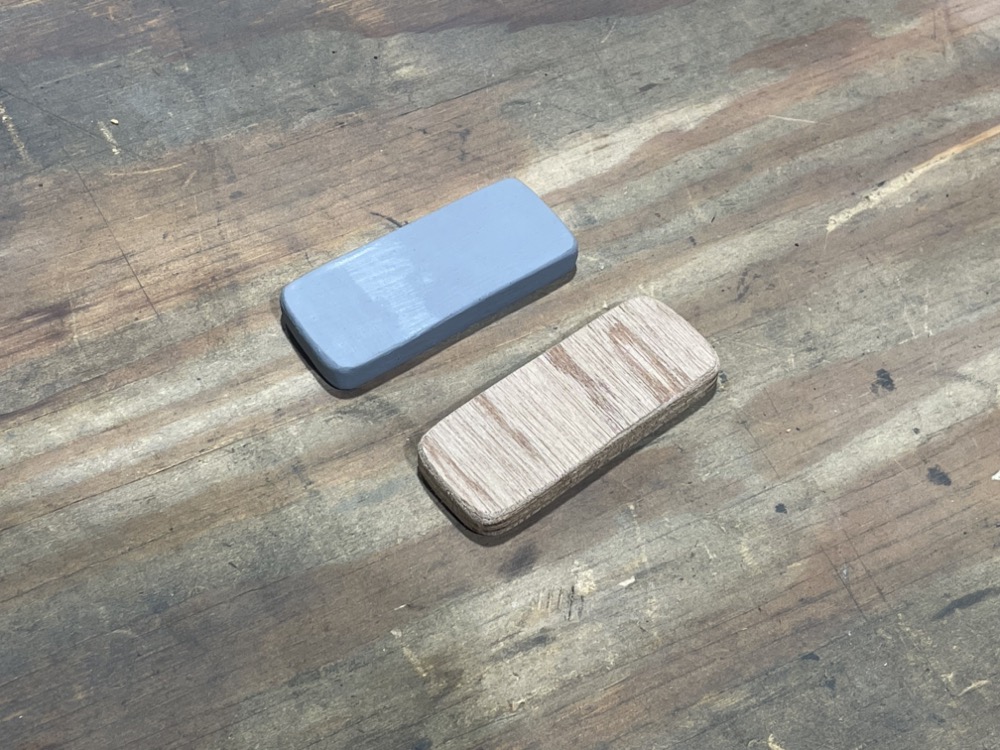
My focus has been on getting the inside of the side seats finished up so I can paint them and get the lids glued on. On the areas that shouldn’t see much water or wear I’m doing a 5% denatured alcohol thinned coat of epoxy and then a second full strength coat once the first tacks up. The paint I’m using is Pettit EZ-Poxy. I’ve been debating what to use ever since I started the build… The main contenders were Awlgrip (expensive and involved to touch up), Awlcraft 3000 (spray only), Alexseal (as expensive as Awlgrip plus I’ve never used it), Toplac Plus (not impressed with it), Kirby’s/Rustoleum (softer and needs to be touched up more frequently). My work buddy and I built a winterizing dock cart two years ago and we slapped a coat of EZ-Poxy on it with little prep work and it’s really held up well.
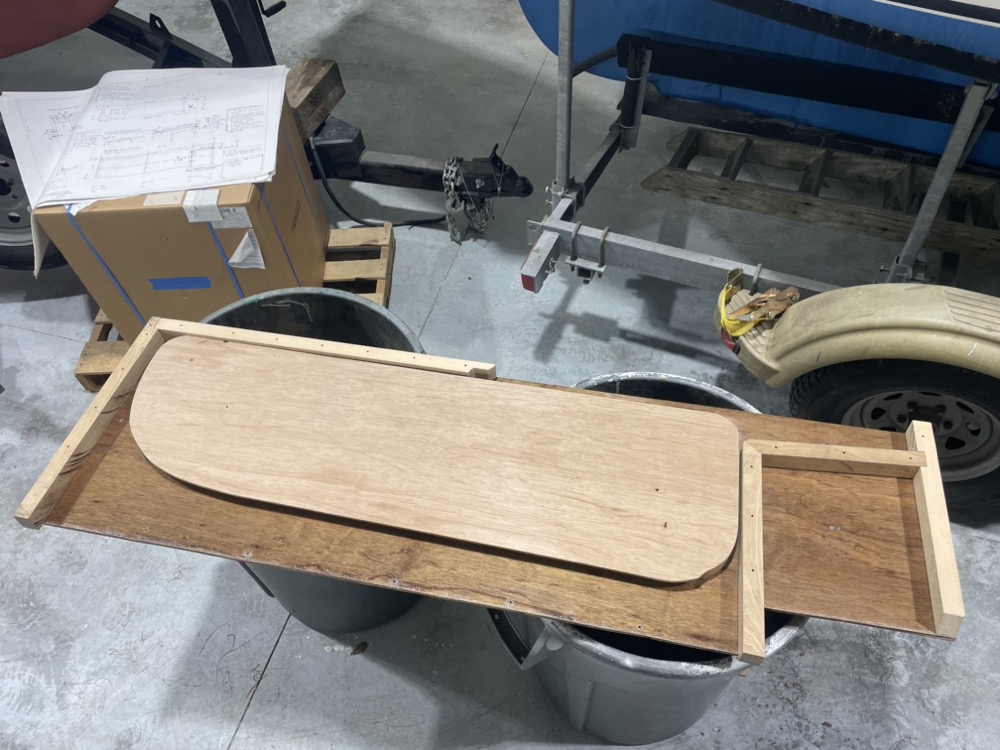
The first thing I painted was a mounting board to test the paint. It brushes on kind of streaky but quickly smooths out. Two coats turned out pretty good although I might add a third in the more trafficked areas of the boat. What’s this contraption you ask?!
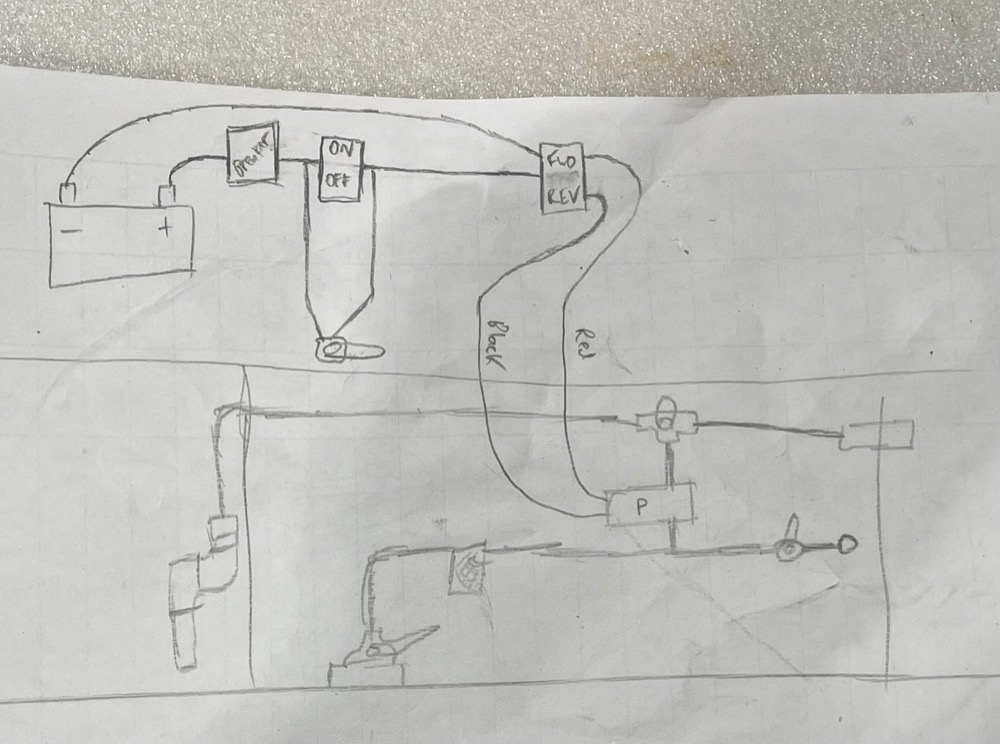
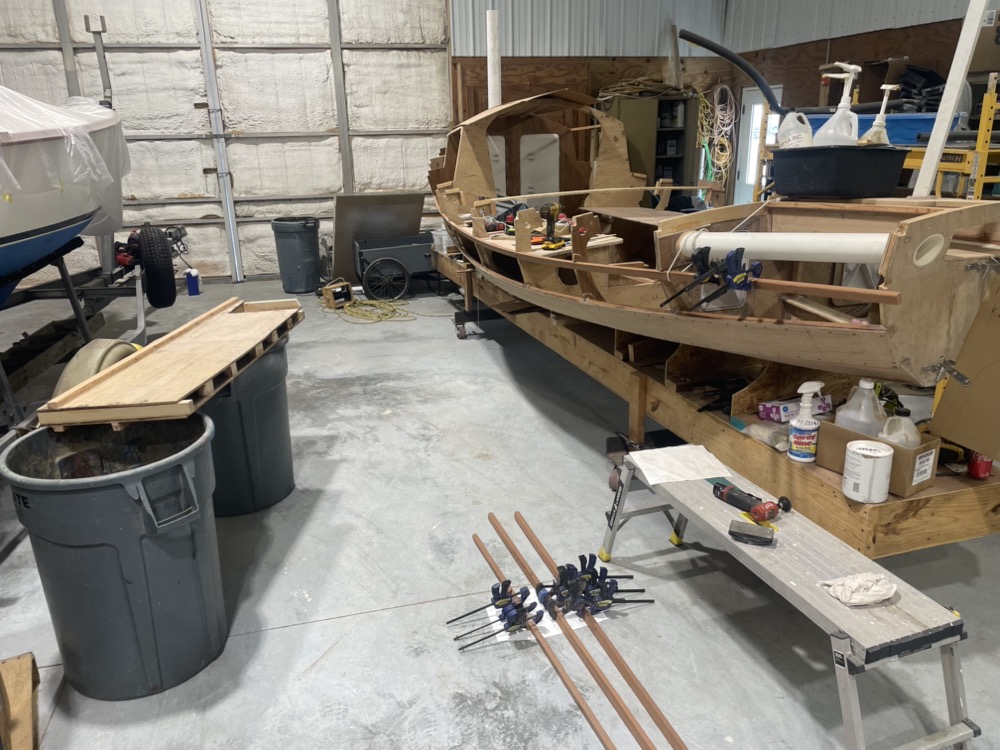
My boat’s plumbing system! With a reversible pump and valves in various positions I can pump seawater into the ballast tank, pump the ballast tank overboard, act as a bilge pump with a plug in float switch and hose, or as a rudimentary wash down hose.
A flanged seacock mounts to the backing plate on the garboard and leads into the strainer. A hose will go through the frame to the PVC pipe and into the ballast tank. Another hose will go to a through hull on the side of the boat for discharge. And a fourth hose will go through the bulkhead beside the inspection hatch to a male cam lock fitting welded to a mounting plate. That will let me attach a bilge pump hose or a wash down hose with female cam lock ends. I haven’t started the electrical side of things yet, but it doesn’t seem too hard. The whole setup is mounted to the board and will fit through the seat hatch once I remove the hoses. There’s enough room to get to the strainer cap and the impeller’s cover plate, although it wont be super easy.
The mounting board attaches to these 3/8″ bolts epoxied into 1/2″ standoffs so the heads of the fasteners don’t dig into the back of the seat front. This plumbing project is totally overkill for the boat, but it has been a lot of fun to design.
I bent a piece of 1/8″ aluminum into an L shape and mounted a pair of toggle switches to the top. The first one has spades to wire a bilge pump float switch in parallel while the second switch is the reversing switch for the pump.
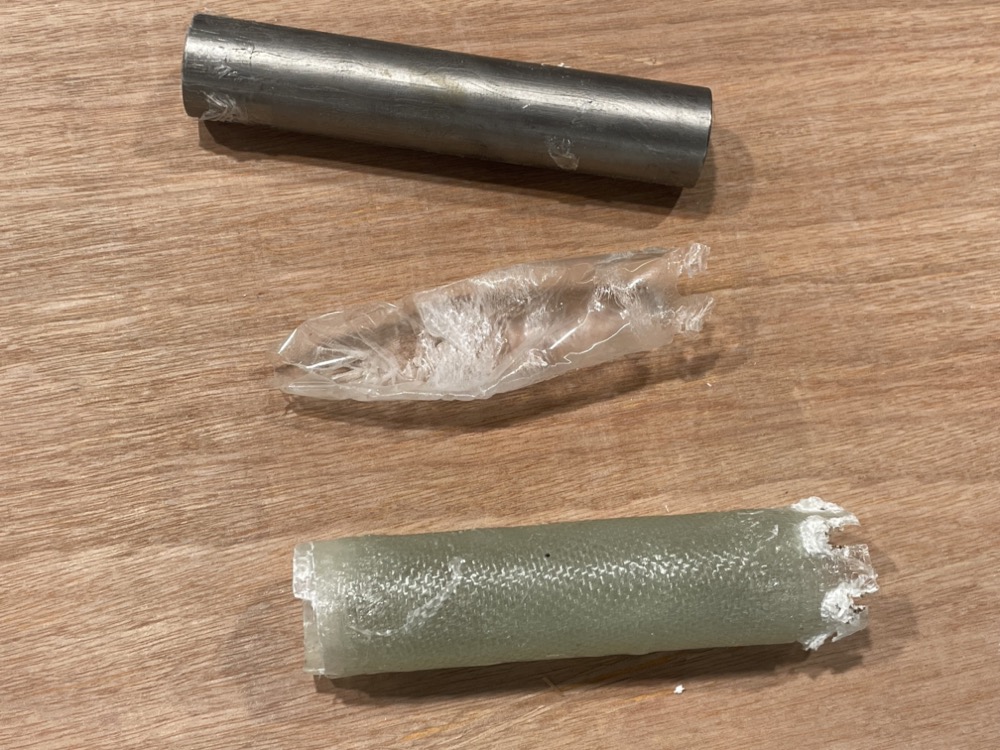
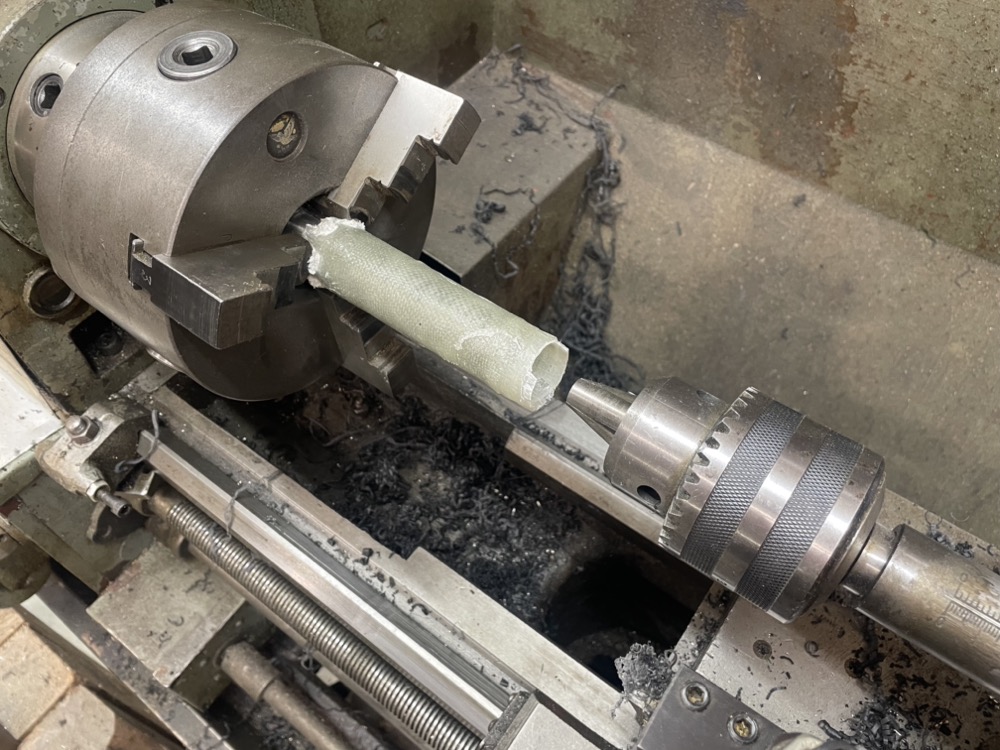
For a while I’ve been using extra epoxy and scrap fiberglass to make a fiberglass tube. I wrapped packing tape around a piece of 1″ round bar and sprayed it with Pam cooking spray. Then I built up about 1/8″ wall thickness from 6oz cloth.
To get it off I lightly held the bar in my lathe and used the tailstock to press the tube off. The surface finish inside was incredibly smooth. All those shavings were from making a new bushing for the halyard swivel in an in mast furler the other day.
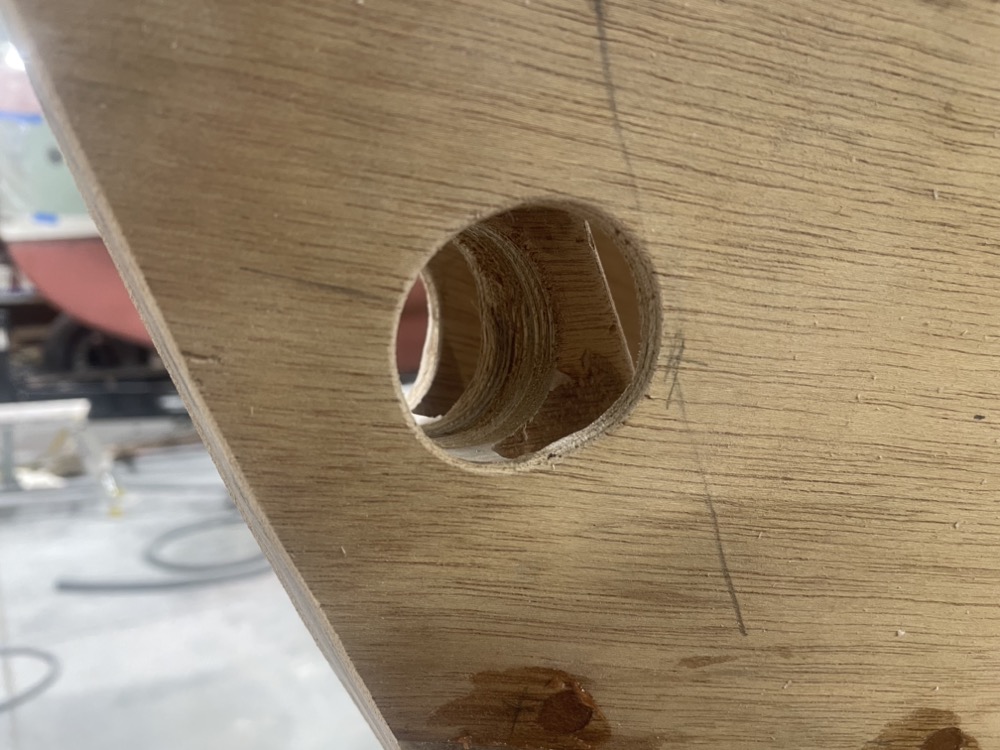
Then I drilled a hole up in the bow. It’s positioned towards the back of the stem.
I really like Mo ‘Poxy’s idea of a soft shackle through a hole in the stem for the painter. I did it on my 15’ First Mate and haven’t had any issues. There’s no fitting to pull out or channel water into the wood via fasteners. It’s probably stronger than a fitting, if it rips out you’ve got bigger problems to worry about. And there’s an option of using it for the bobstay on a future sail plan idea I’ve got that requires a bowsprit.
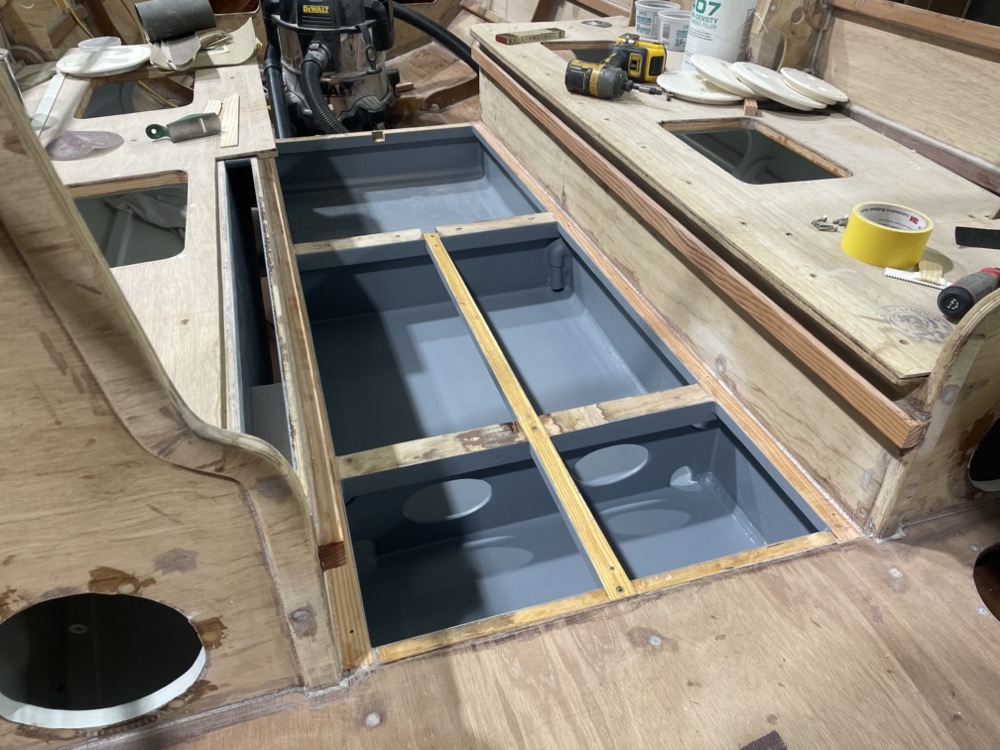
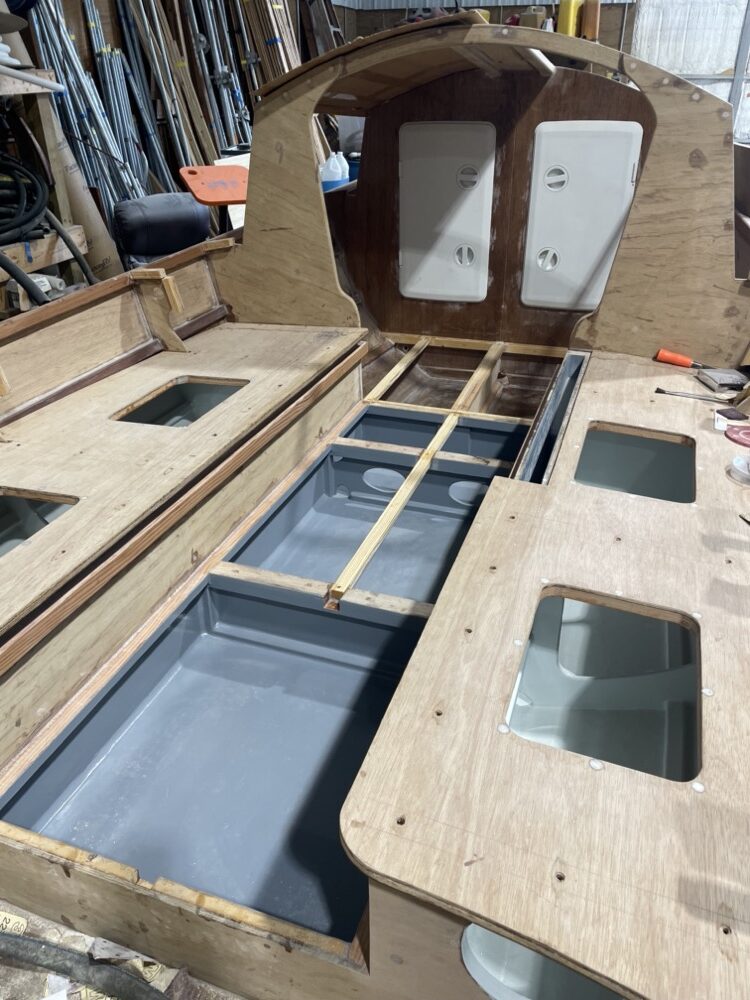
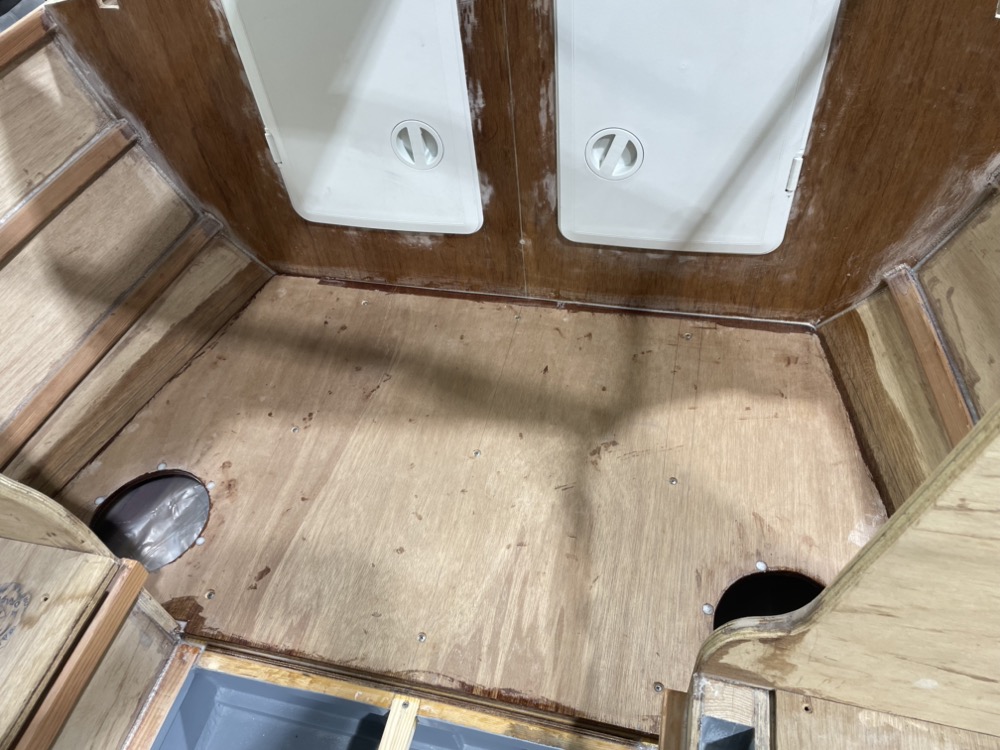
I’ve also added the supports for the raised sole and coated the footwell and ballast tank areas. I did a coat of epoxy followed by two coats of Pettit Protect. The nice thing about the barrier coat is that it doesn’t need to be sanded to recoat within 60 days. I’m really trying to minimize sanding since it takes up so much time.
I’ve also coated the underside of the seat tops and the cuddy cabin floor with three coats of epoxy. They won’t be exposed to UV so I’m inclined to just leave them bare. I’m considering tinting the epoxy white inside the forward and aft compartments just to brighten things up and leave a surface that’s easy to epoxy to in the future if I want to add brackets or whatever.
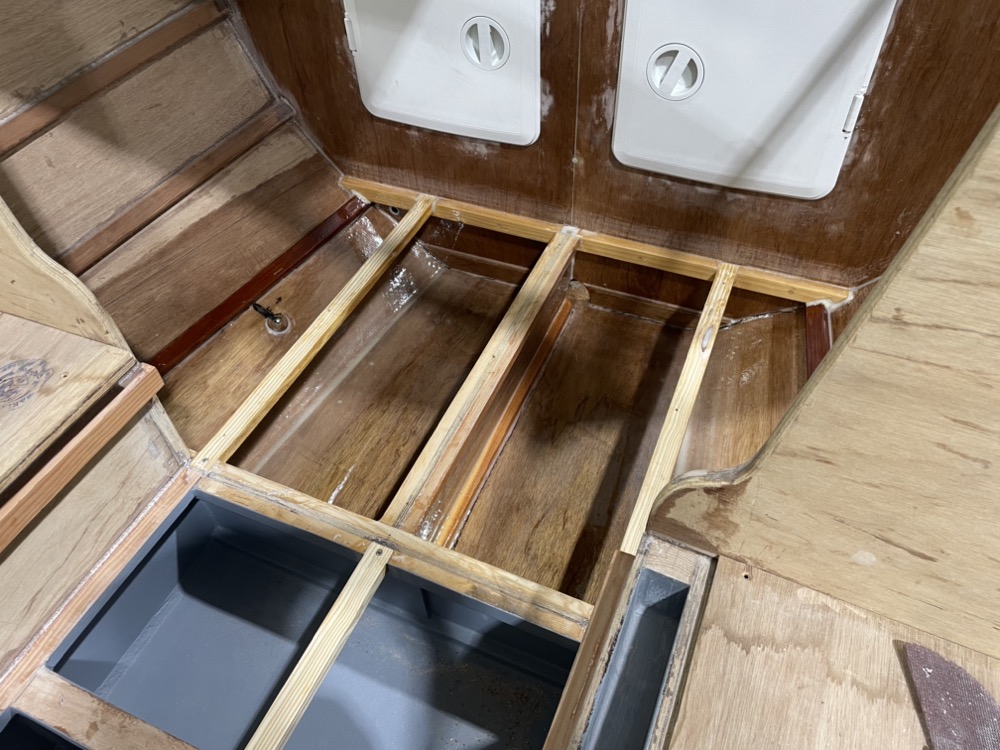
Next I got the floor under the cuddy cabin installed. Underneath on the port side I have two 3/8″ cable glands through the bulkheads for the power wire to my pump setup. The glands have pipe threads so I drilled a large hole, filled with 404 and then used a pipe tap to cut the threads. In the middle of the span is a plywood “weld mount” with a wall mount zip tie to support the cable. I make these when I have extra ply and epoxy and it’s just the plug from a 1-1/4″ hole saw with a 1/2″ hole in the middle filled with 404 and tapped 10-24. There’s enough room to get in there with a right angle screwdriver and change the zip tie if I ever need to, but best to get it positioned now.
Then I got the 1/2″ floor installed. I arranged plastic sheeting underneath to catch any drips and I reached in as far as I could to smear the squeeze out into something approximating a fillet instead of a bunch of stalactites waiting to cut my hand open years from now. One this cures I’m going to come back and make some nice fillets all around from 407 to aid wiping the floor out.
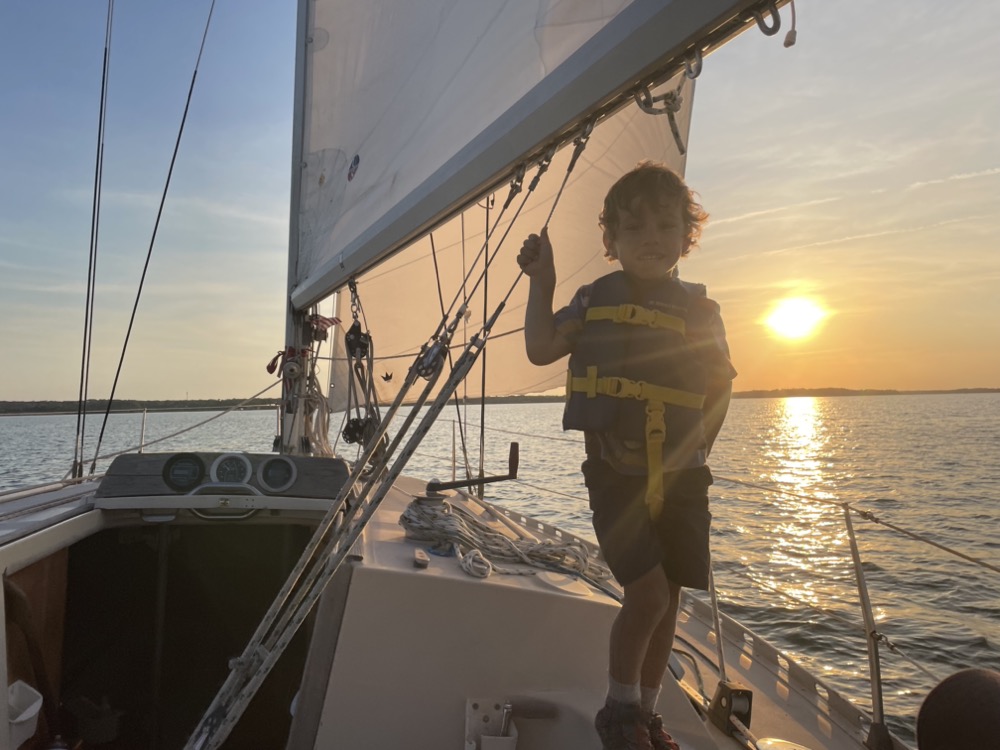
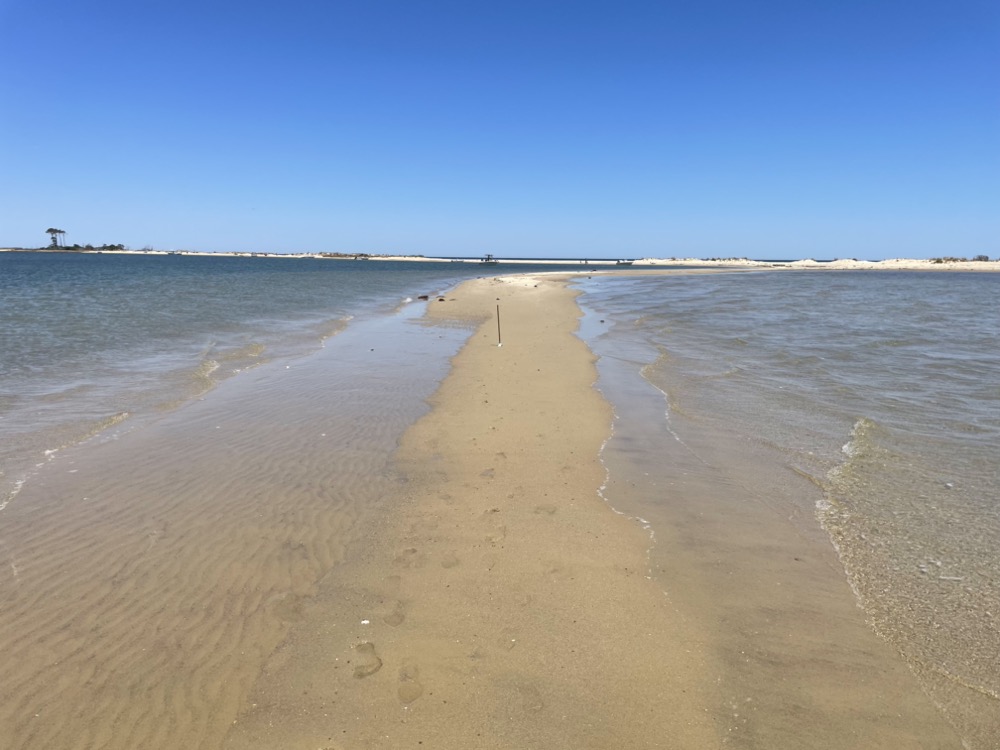
First outing of the season and it was back to the sandbar at Gwynn’s Island for the day.
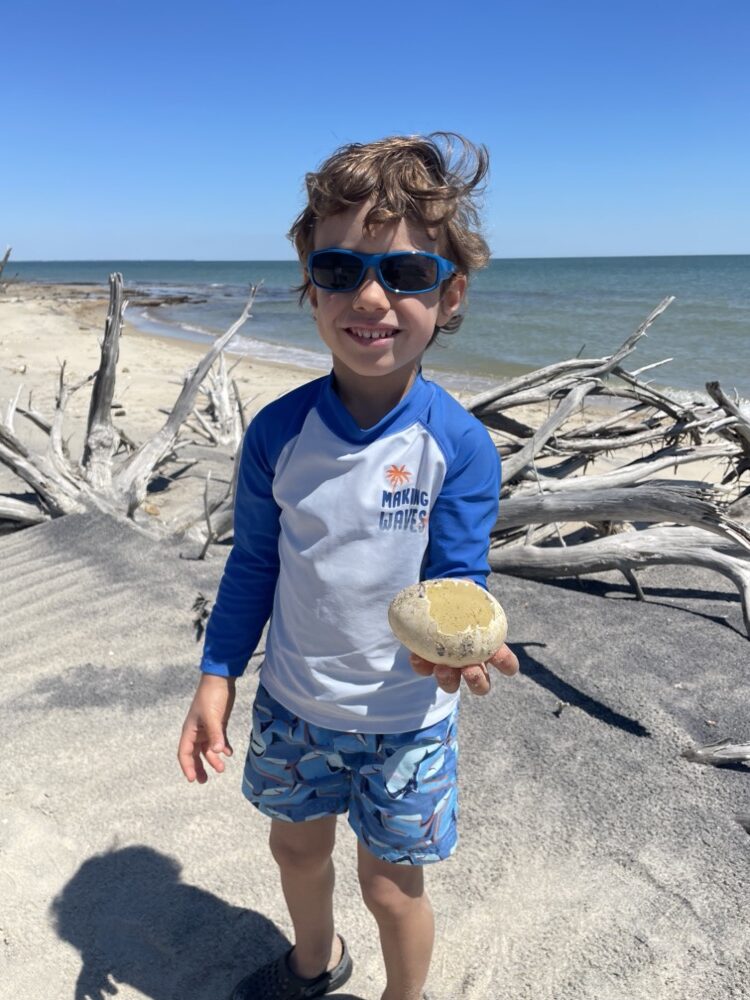
Henry found a Canada goose egg. A little bit farther ahead we found a basically brand new Zebco 33 fishing rod complete with an incorrectly set up fish finder rig. Nobody came back for it during the day, so it went home with us! On the other side of the beach I found a deer carcass so I showed him where peepaw had some vertebrae fused. We looked at the knee joints and how the ribs protect your vital organs.
There were about 10 boats out and the one next to us was a Regulator 28 with dual 250hp outboards. These things go for about $300,000 as best I can tell which is absolutely insane. Meanwhile mine took maybe $2,000 to build.
It was a pretty brisk day, a little chilly and decent wind. Fortunately the wind was with us on both runs and we made excellent time.
We must have did at least 10 walks during the day and explored every inch of the sandbar. At low tide more of the bar opens up and theres even a small island that appears.
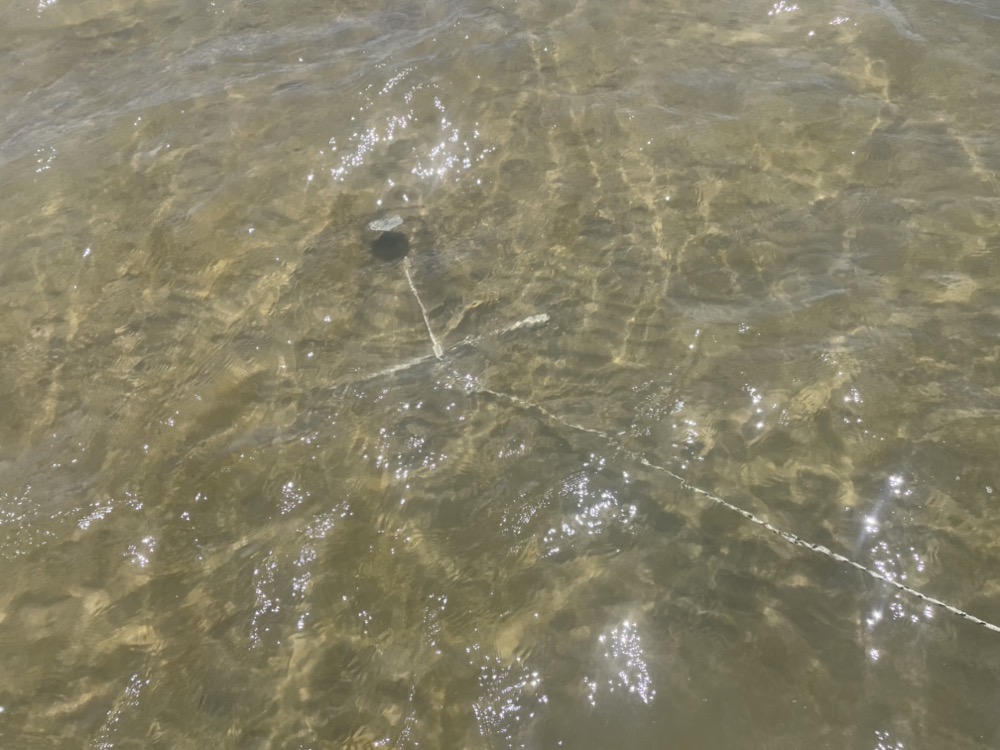
My homemade fisherman anchor really works well. At some point I will write an article about how it works.
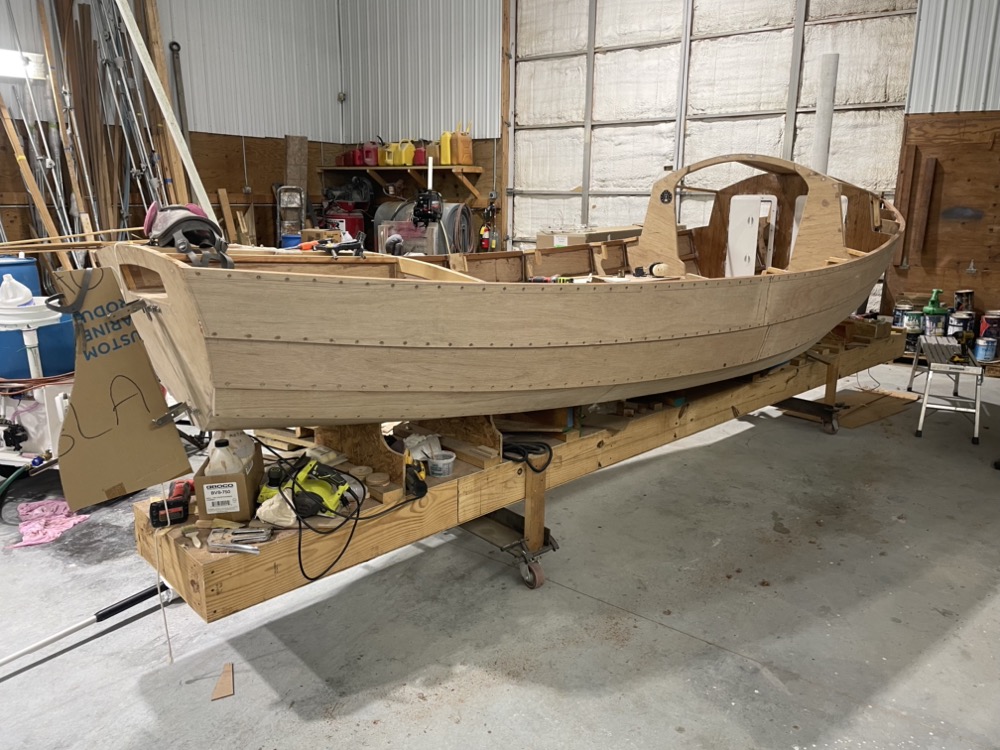
It’s been a while since I’ve had much to post. December was super busy hauling boats out so not much got done. Since then I’ve been working on a lot of smaller jobs on my boat but not really completing much of anything. Plus we have a varnish job in the shop which has put a bit of a crimp on how much dust I can make at times. But I have been doing lots of epoxying and filleting under the two side seats so hopefully soon I can paint them and glue the lids on. I’ve also been working on the ballast tank plumbing and electrical glands and conduit.
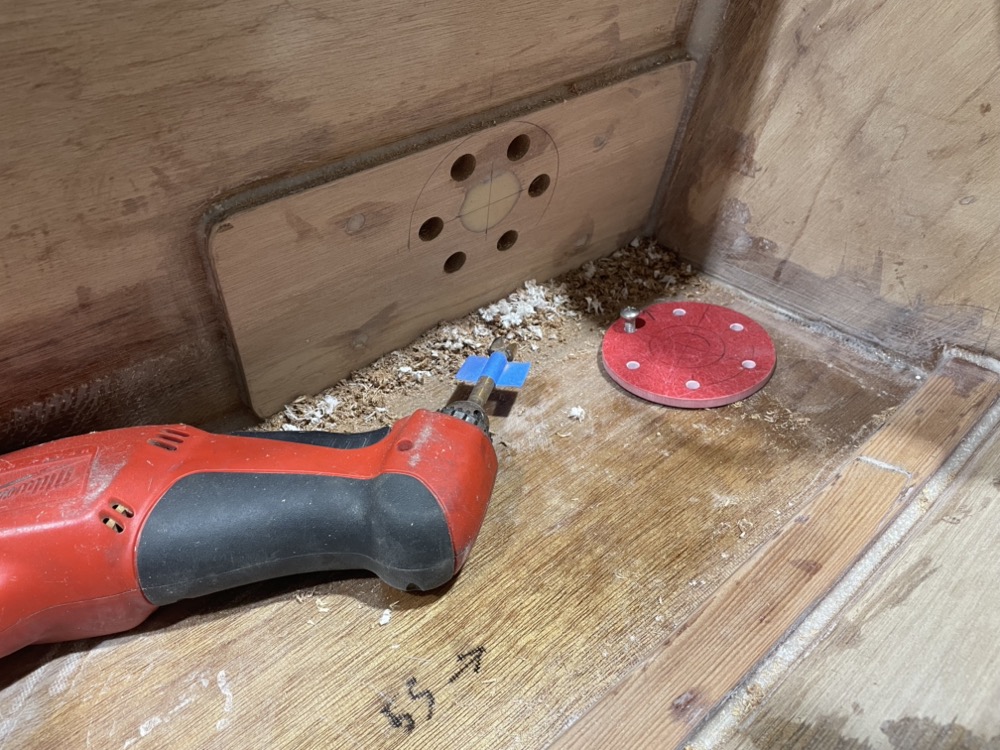
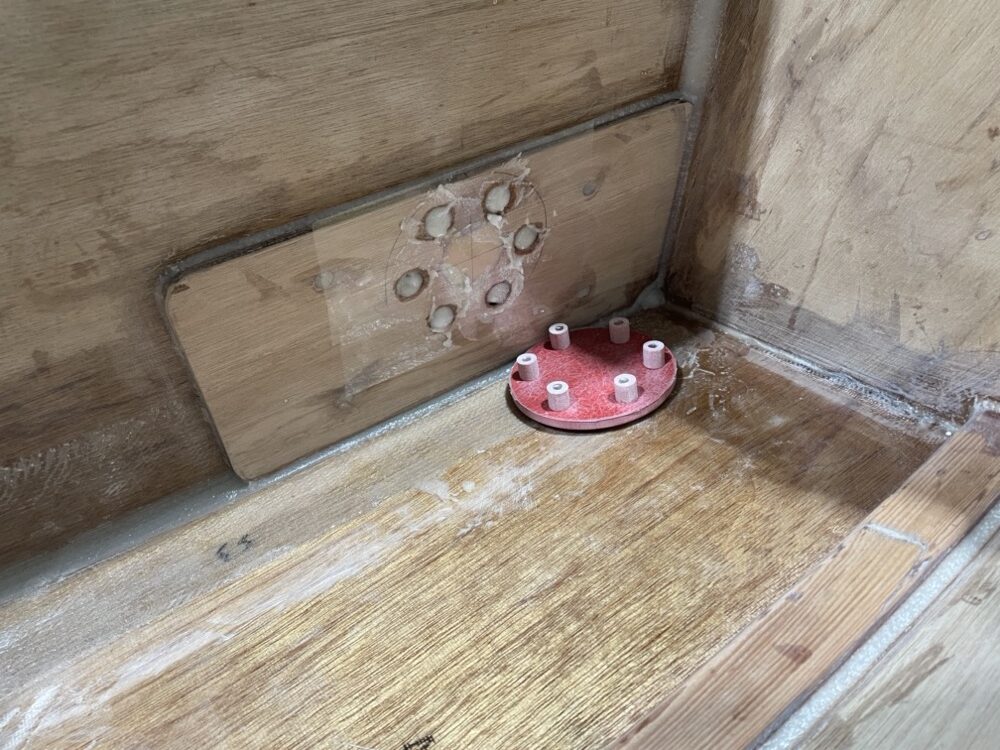
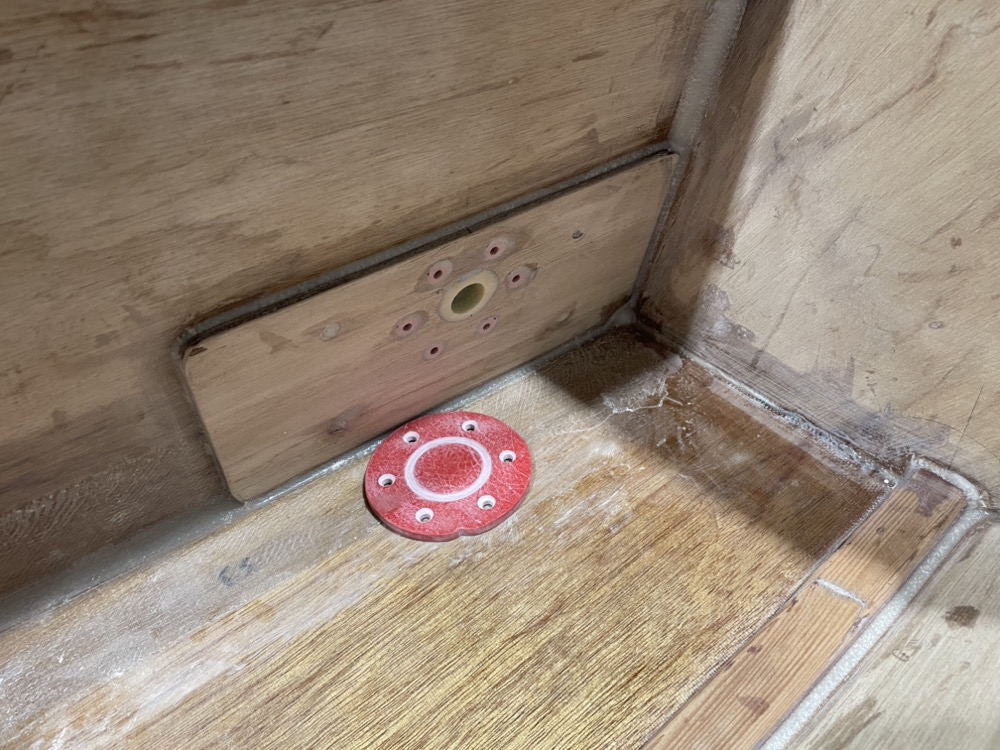
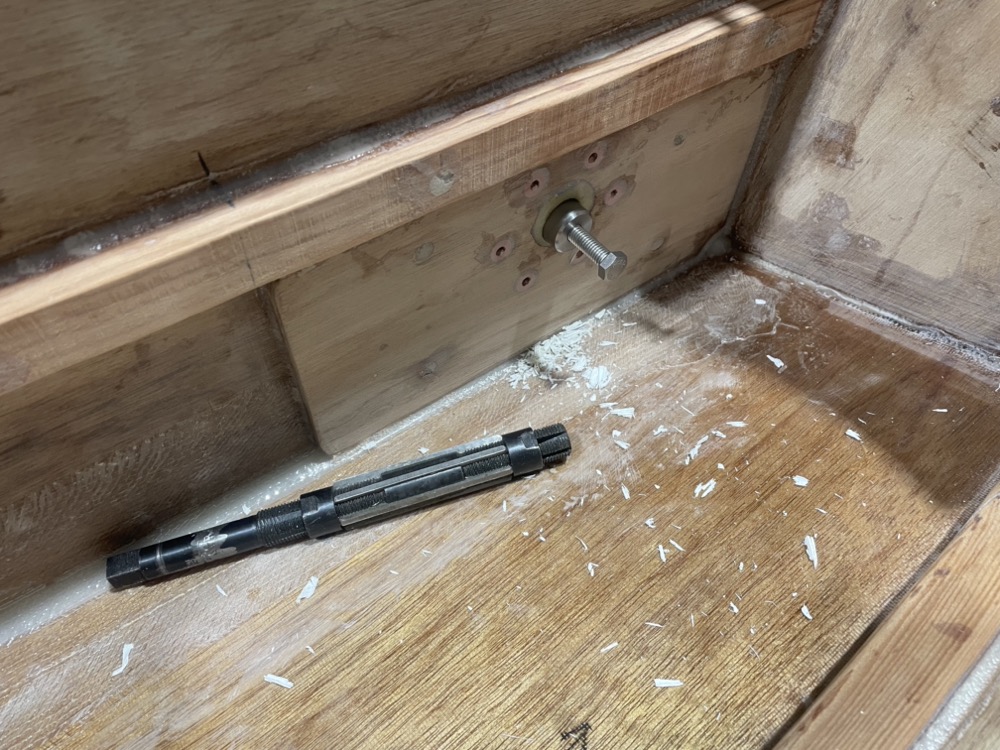
One job I’ve completed is the off-centerboard pin. The trunk makes up the starboard side seat front so it’s out of the way for sleeping on the centerline. The pin is below the waterline and inaccessible on one side and awkward to get to on the other, so I’m trying to pay particular attention to make it watertight and rot proof. The inboard side has a plywood cap epoxied on inside the ballast tank while the outboard side has a removable cover so the pin can be removed. I made the cover from 1/4″ fiberglass. The spot for the pin itself is epoxy thickened with 404.
I could have drilled and tapped the oversize holes, but it would be difficult to do and I likely wouldn’t have drilled the holes perfectly straight. So I made some fiberglass threaded bushings, screwed them to the cover plate, and glued them in. I covered the plate and plywood with packing tape so I’d be able to get them off again.
Then I glued it in place. The bushings were about 1/16″ long so after it cured I removed the cover plate and sanded everything down flush.
Next I put the cover plate in my lathe and turned a groove for the 4200 to form a bit of a gasket. I also heavily countersunk the holes so they’d have plenty of sealant too. A notch at the 12 o’clock position provides an alignment reference, although I laid the holes out pretty accurately so it might fit in any orientation.
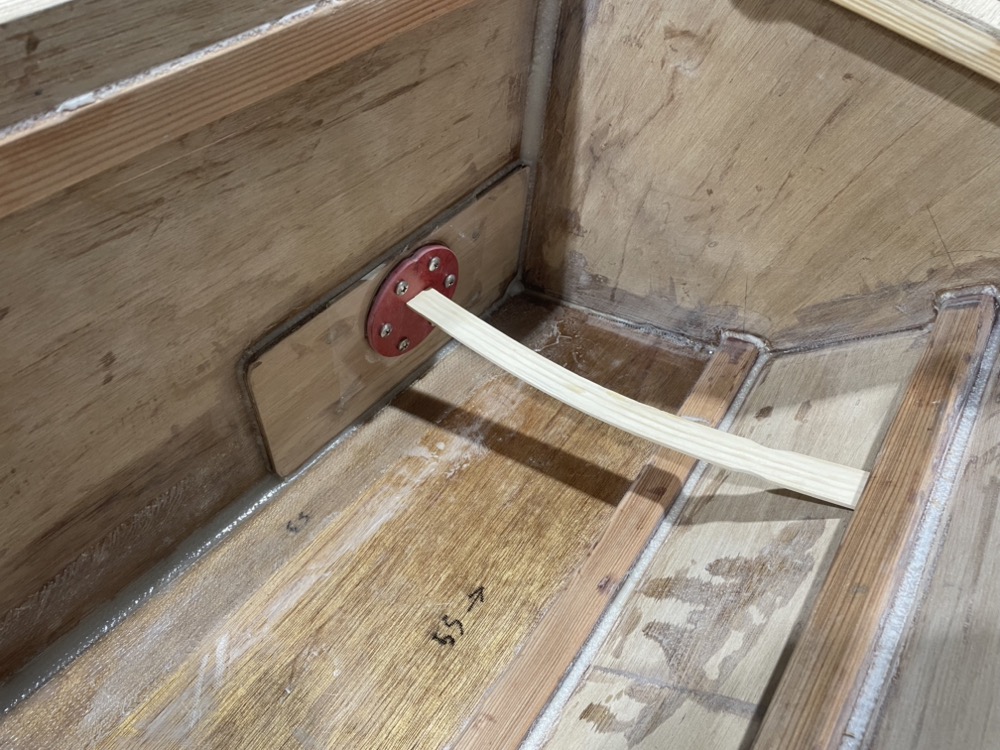
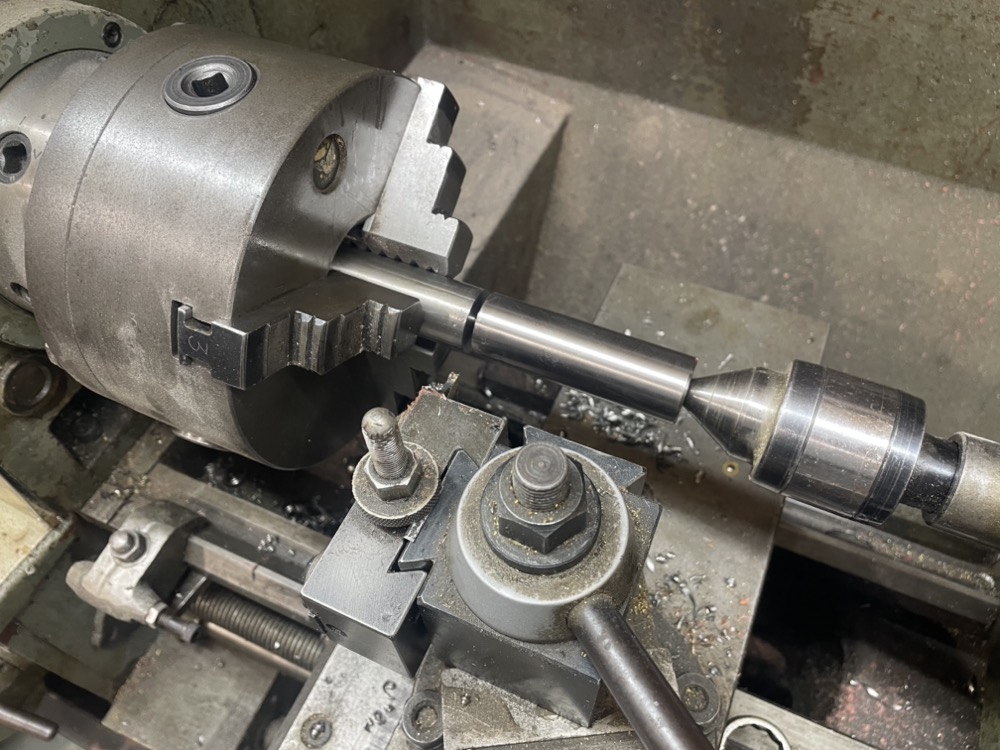
Next I needed a centerboard pin. I’ve had a 1″ diameter bar of titanium floating around after I machined my wife’s engagement and our wedding rings from it. I haven’t thought of anything better to do with it in nearly a decade so I made the pin out of what was left. I don’t recommend parting with the tailstock, but I forgot to take a picture until after I’d already cut it off. So I just stuck it back in place for the photo.
Next I drilled a 15/16″ hole and reamed it out to accept the pin with an adjustable reamer. There’s a 3/8-16 hole so I can get a bolt on it to pull it out when I need to remove the board. The starboard seat insides are finally done and ready for epoxy and paint, and the port side is not far behind.
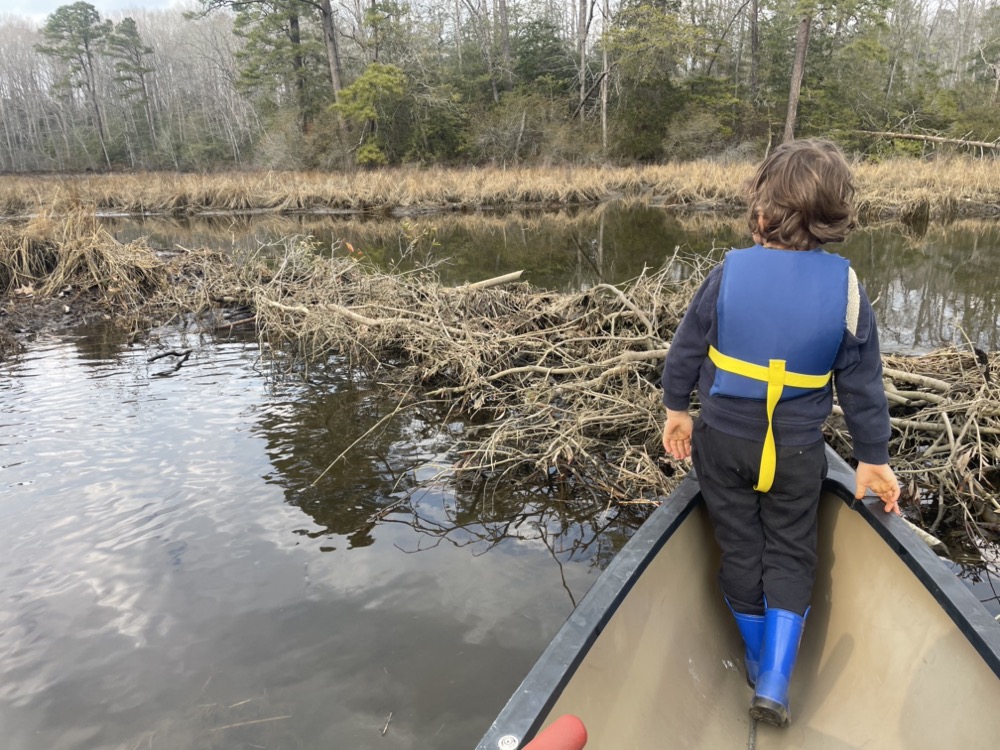
After a pretty cold and miserable winter we finally had a weekend with nice temperatures so we took my Old Town Osprey canoe out. I bought this thing when I was in the 8th grade with my grass cutting money. There’s a beaver dam at the head of our creek so we set out to find it. But lo and behold, over the winter they’ve moved it 500′ down the creek and cut off a cool fork you could take.
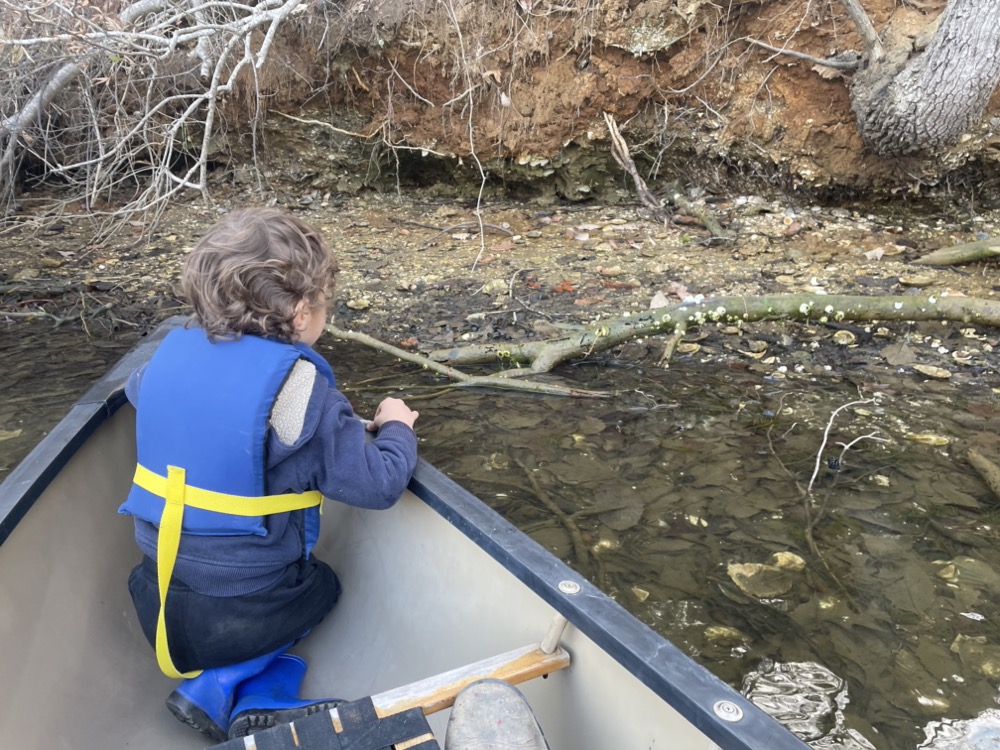
There’s a number of fossil sites along the creek that are a couple feet thick of Jeffersonian scallops. It’s fun to go by at low tide and see if there are any good ones. There are tons sitting in the water, but they typically have barnacles or oysters growing on them so it’s best to go after a big storm when fresh ones get washed out.
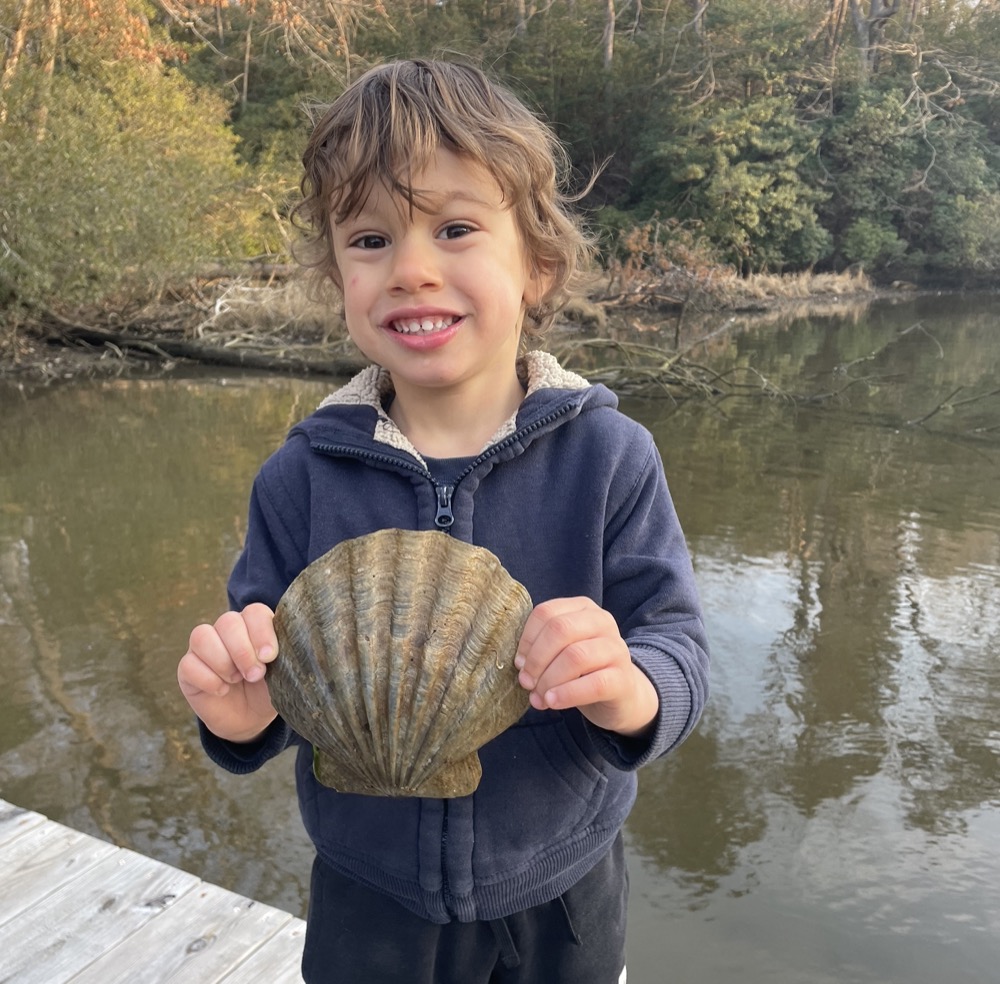
We were in luck because I found my biggest and best one yet! Apparently these lived during the early Pilocene era 4.5 million years ago.
What’s super cool is that it has a round drill hole from some ancient gastropod that turned it into lunch! In the couple dozen shells I’ve pulled out or seen I haven’t come across another drill hole. I think I’m going to make a nice varnished plaque and mount this guy on it and hang it on a wall.
We mudlarked our way back to the dock and found a rusty garden hose outboard motor flusher and a coffee mug in perfect condition. I don’t know if it is a one off or mass produced. There’s no name or symbol on it that I could find. It had a very light scum so I don’t think it’s been in the water all that long. Unfortunately I doubt it fell off Captain John Smith’s exploration shallop. Either way I cleaned it up, ran it through the dishwasher a few times, and it’s in the mug cabinet now!
That was an enjoyable afternoon for the first time on the water this year. We rowed about 2.5 miles and saw a couple bald eagles, lots of blue herons, an osprey, some periwinkles, and a dead speckled trout.
Not being the biggest fan of rowing, my buddy and I tried to set a Universal 5432 engine into the boat to see how it’d fit. It looks like it’ll be a little large, but the V drive should help with the angle.
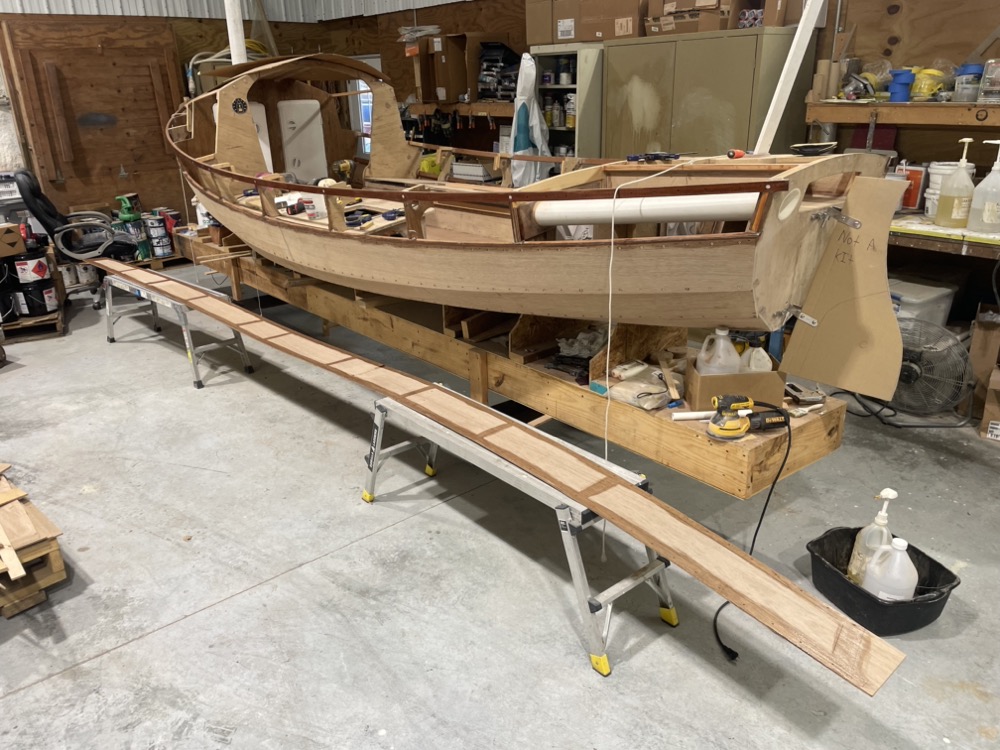
Finally working on the last pair of planks. After dry fitting I primed everything with straight epoxy so the wood won’t absorb the resin out of the 403 microfibers.
Then I slather on the thickened epoxy with a notched spreader and use my two hanging strings and work platforms to support the plank. It’s been difficult hanging planks alone, but it all works out. I don’t generally take pictures during this step since my hands are gooey but I figured I’d take a few since this is the last set.
Then I come back and drive all the screws in, clean up the squeeze out, and make nice fillets at all the interior joints. It takes about 2.5 hours to install a plank and about 12oz of epoxy.
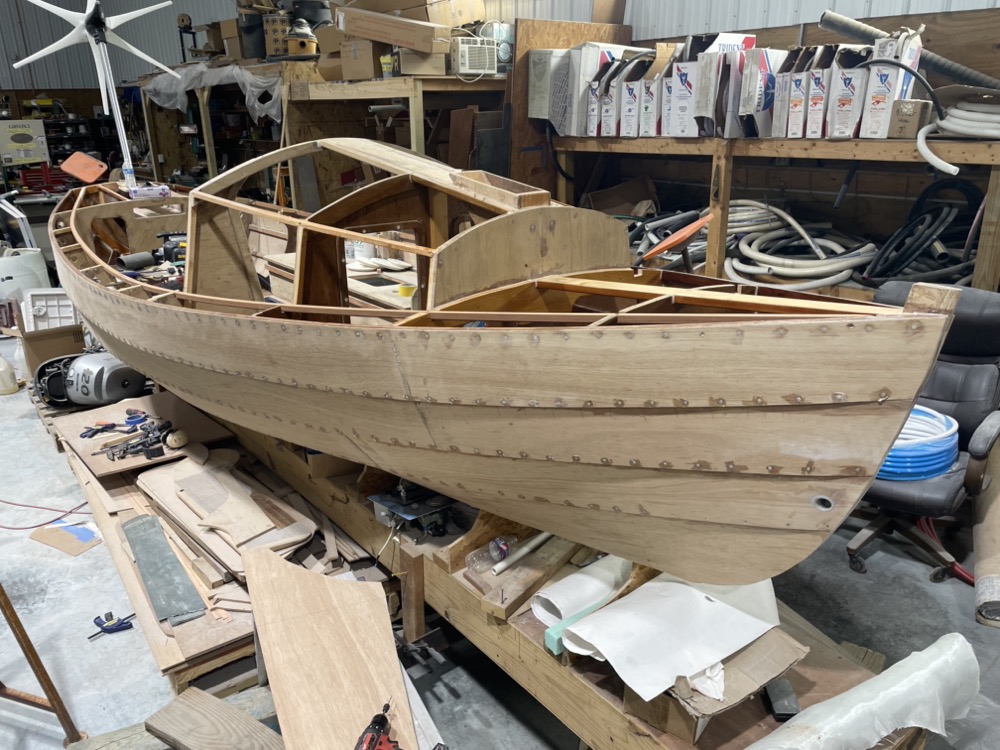
Planking is finally finished! Finishing the inside is going to be more difficult, but my wife has been out of town and I figure it’s a better use of the larger chunks of time I have. Between now and Christmas we’ll be non stop hauling boats out for the winter so I won’t have much time at all to work on it.
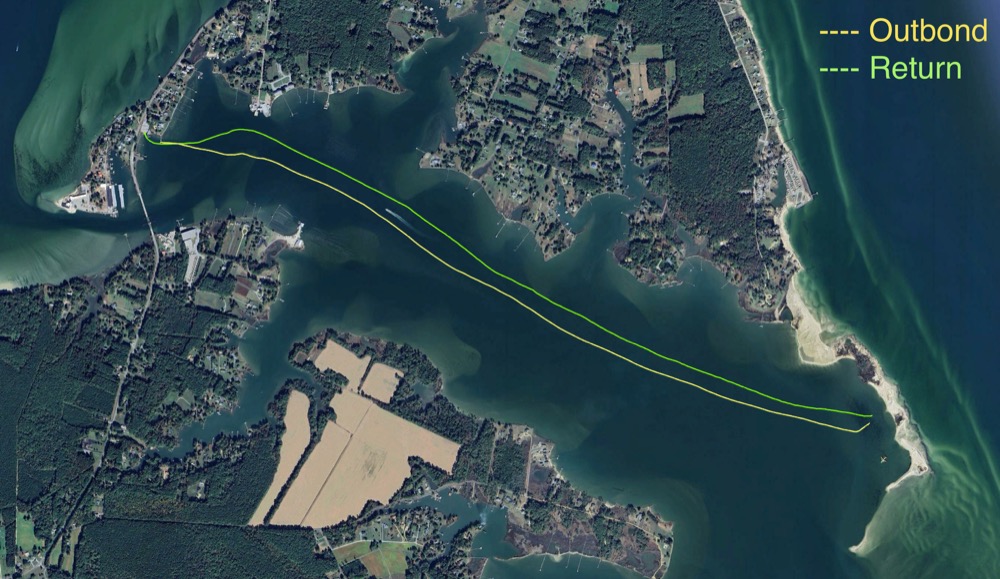
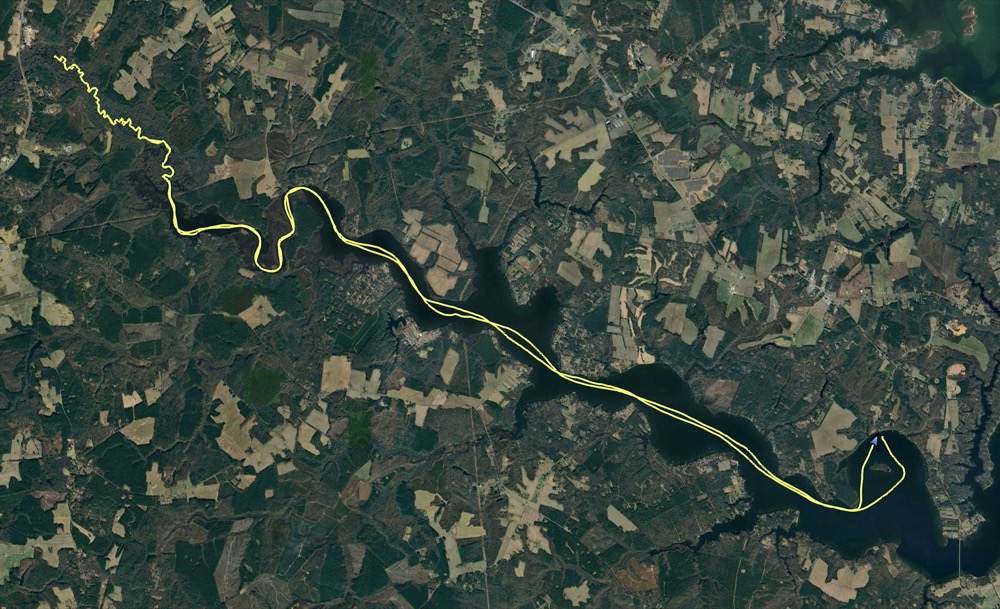
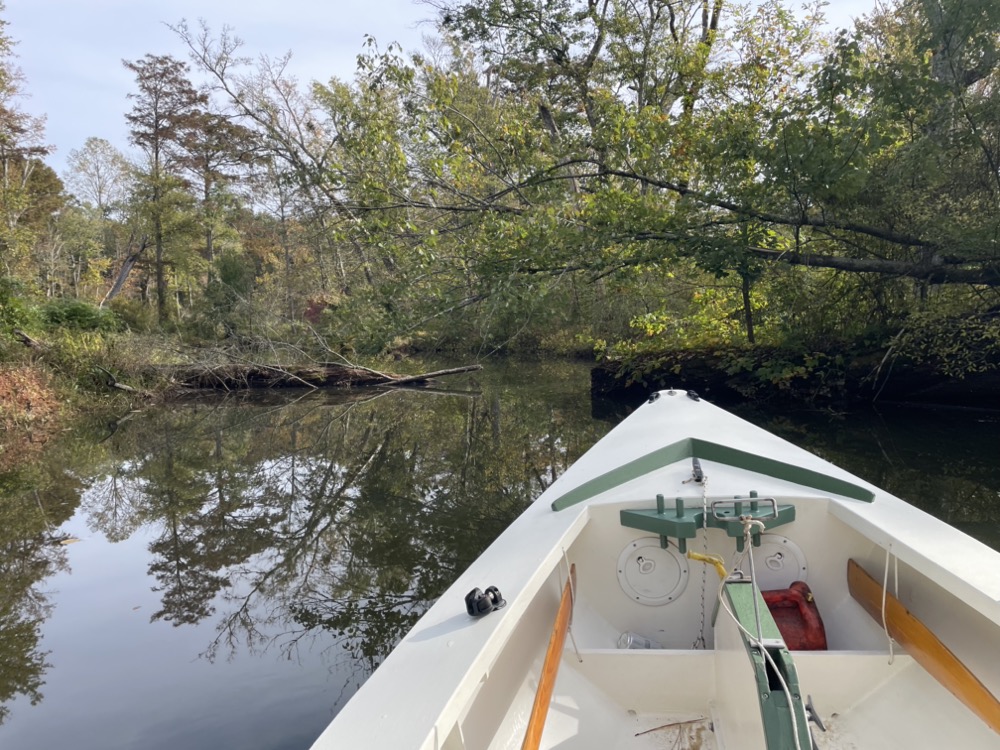
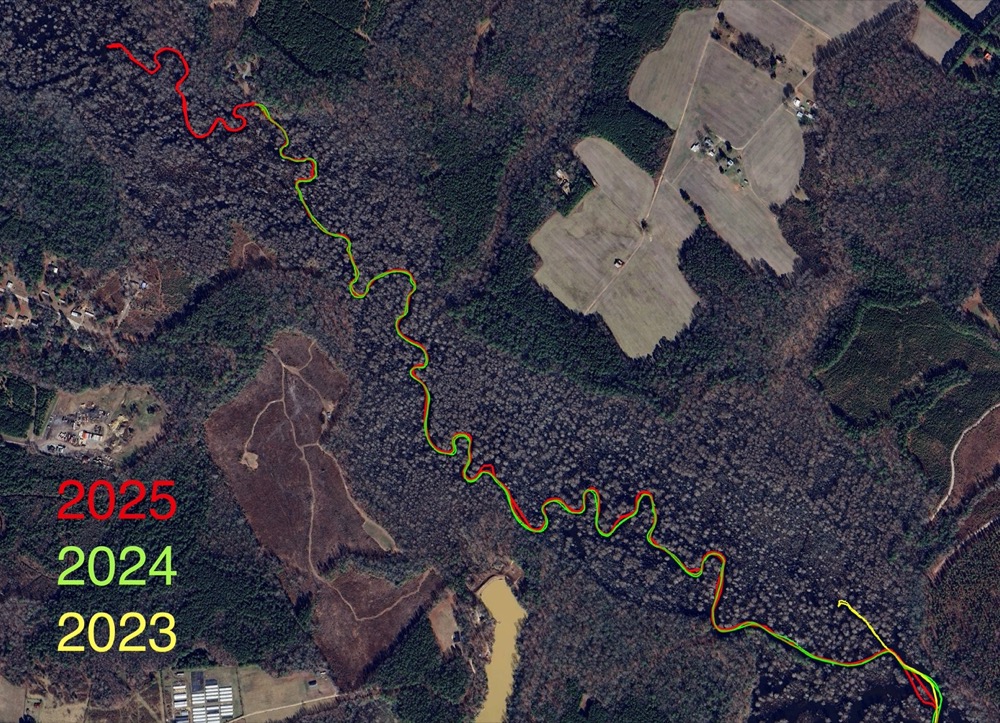
The last two years in the fall I’ve motored up into the Dragon Swamp at the head of the Piankatank River because it is just so beautiful. 2023 and 2024
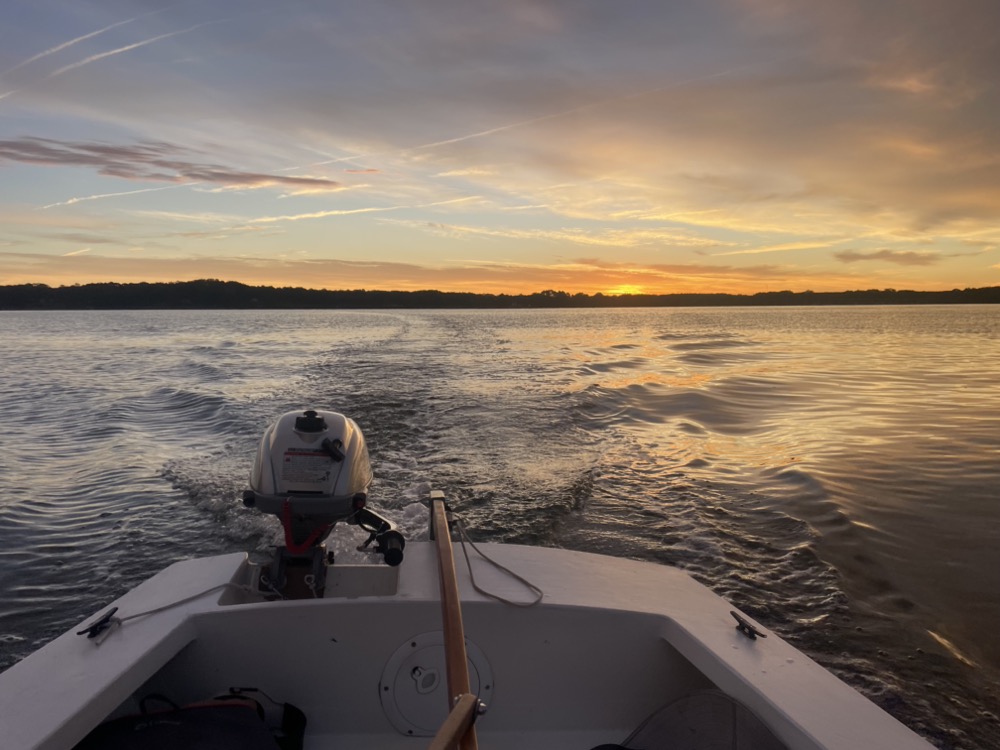
I left the boat ramp at 7am with a pink sunrise. Fifteen minutes later the sun started to peak over the treelined shore. Two older guys from Richmond were launching a jon boat and asked a few questions about mine.
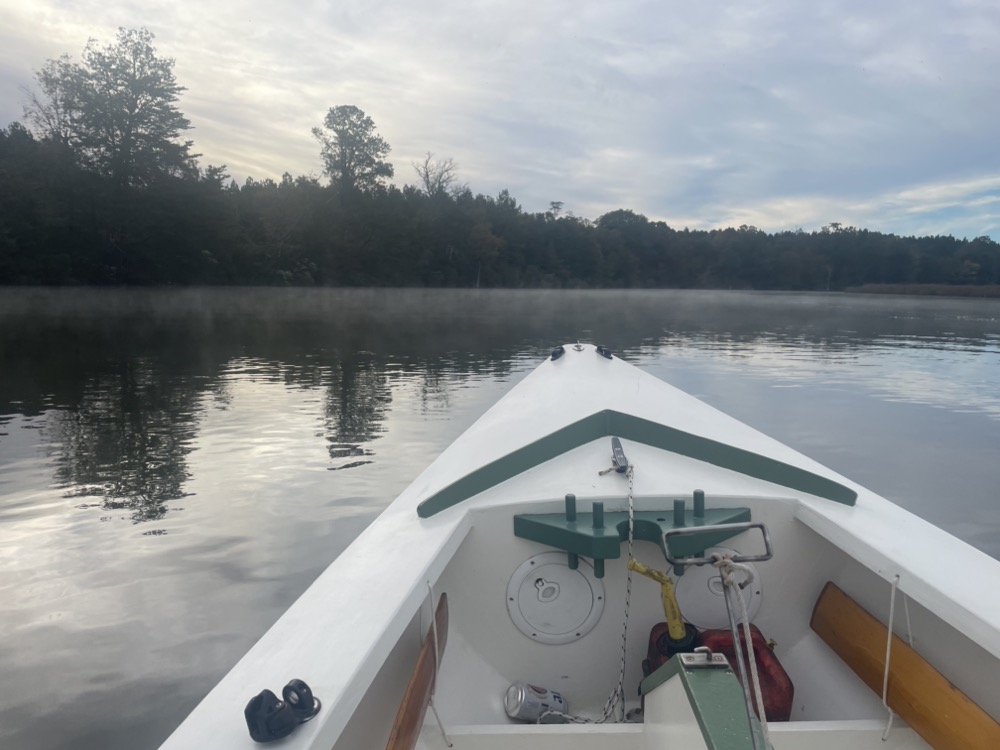
The morning was pretty overcast and rather chilly compared to the previous years. I ran into a patch of sea smoke up where the phragmites start.
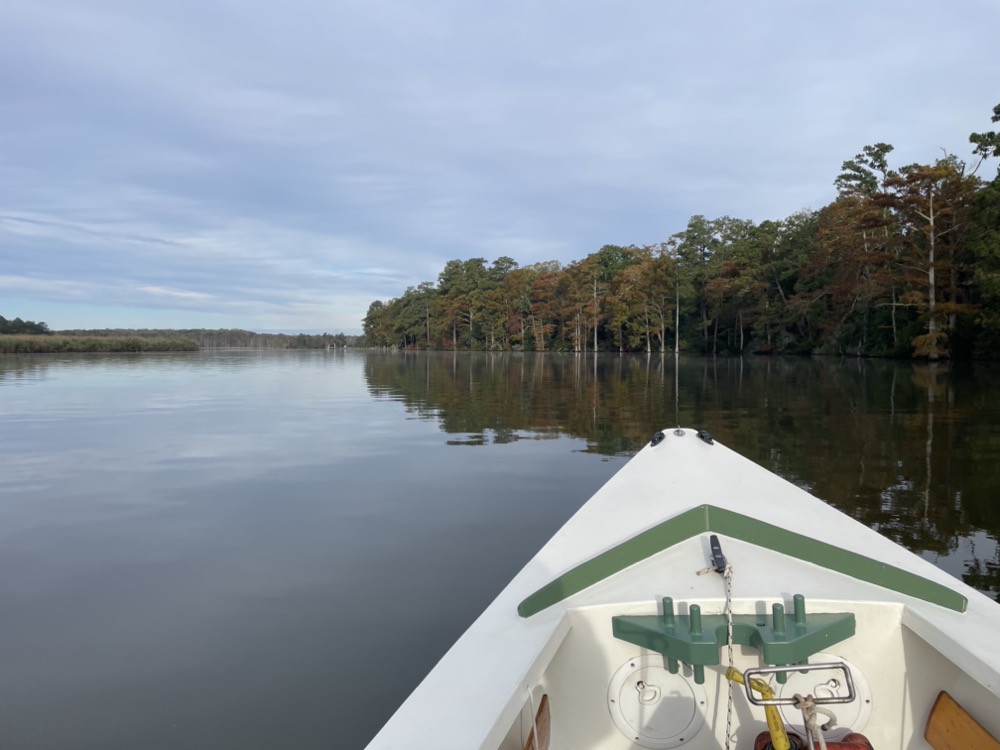
Closer to the swamp I started hitting a line of towering cypress trees.
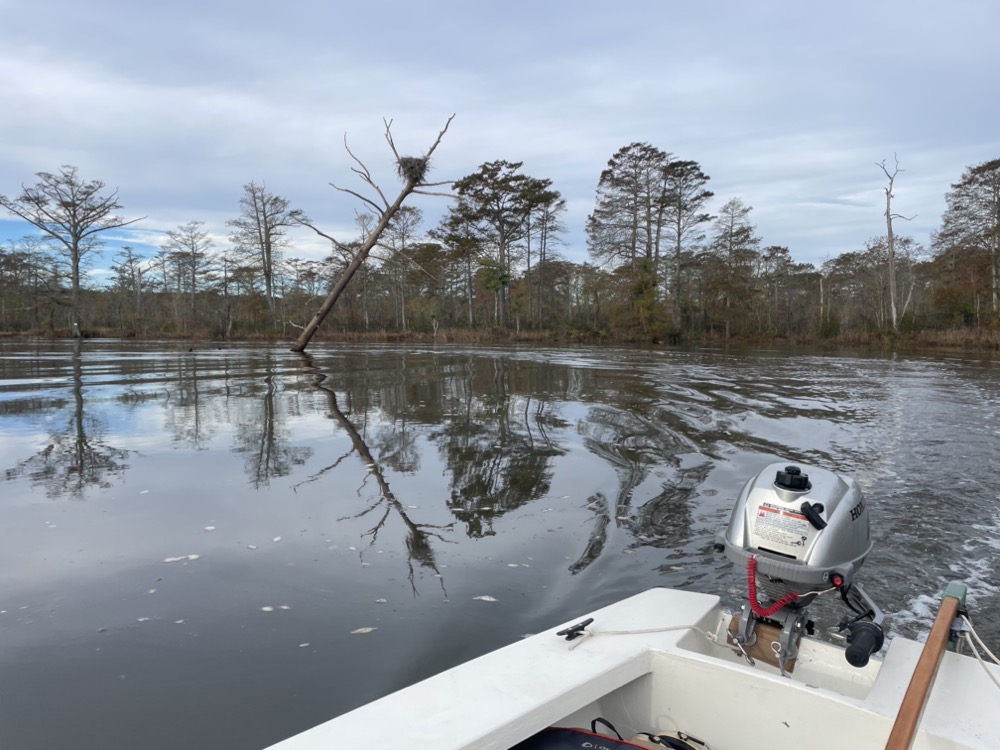
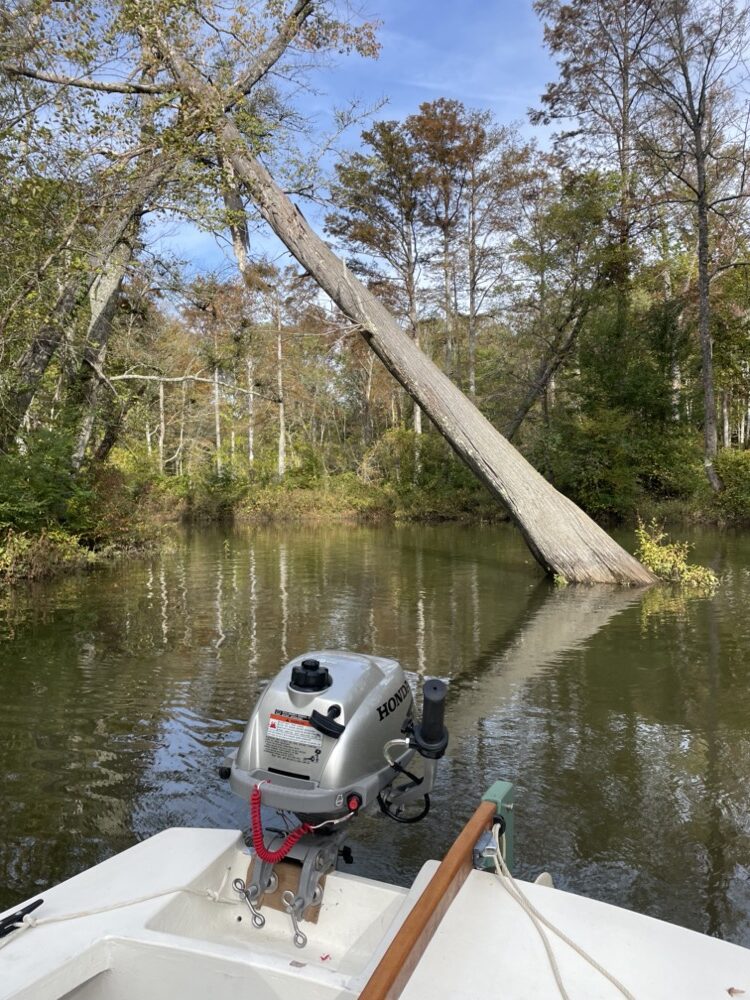
Soon enough I made a 180 around the leaning tree with an eagle nest which is where it really starts getting beautiful.
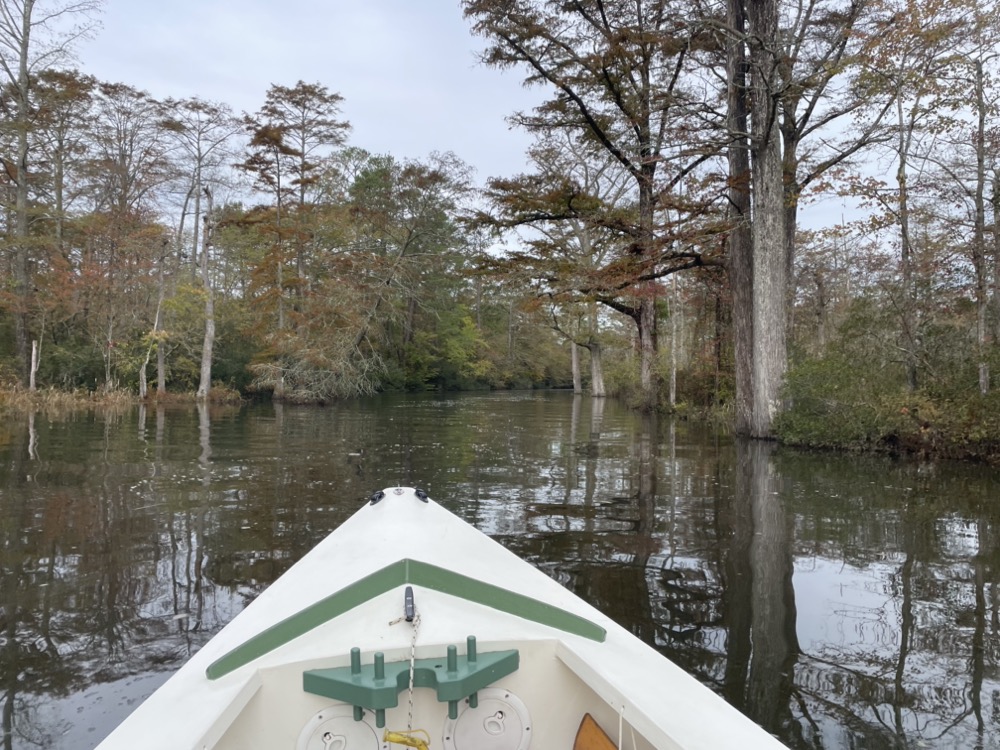
Pretty quickly the river narrows down to about 50 feet.
Like previous years I came across a few guys fishing. Funny enough, this is the same guy I took a picture of last year!
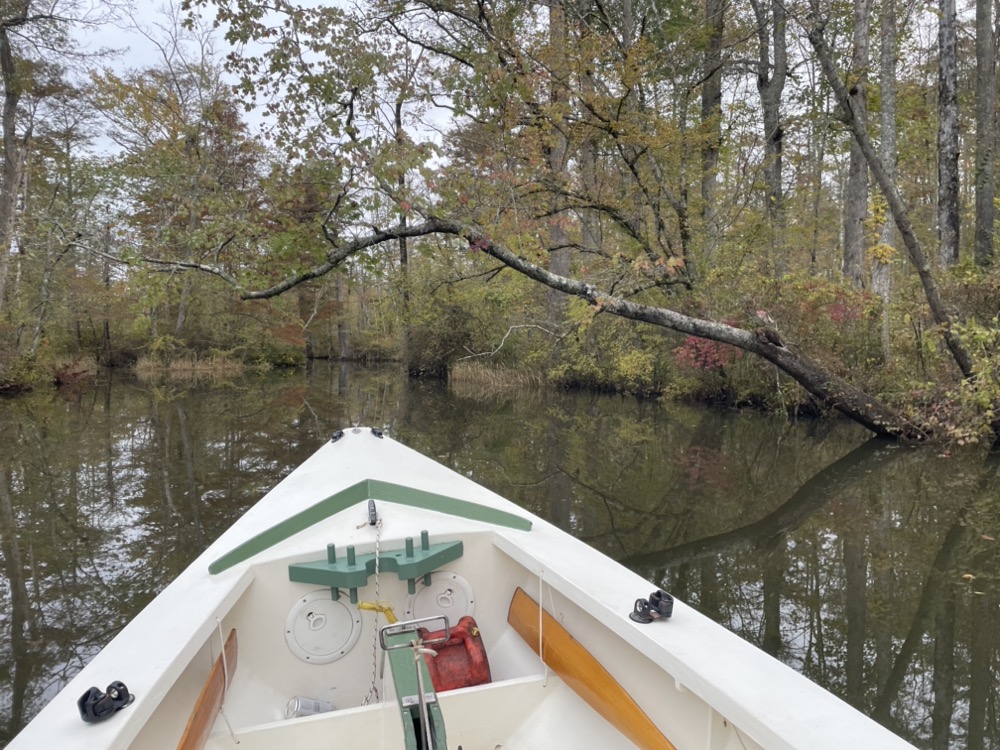
This year the tide was in my favor and we’d had a really wet couple of months so I managed to bump my way over the log that stopped me last year and make it into new territory.
This stretch of river is definitely canoe and kayak oriented with little holes cut into fallen trees. I just barely fit through this section. There are way more shallow logs that I had to bump over too. Generally I managed to get the motor into idle before I hit them and it popped the motor shaft up.
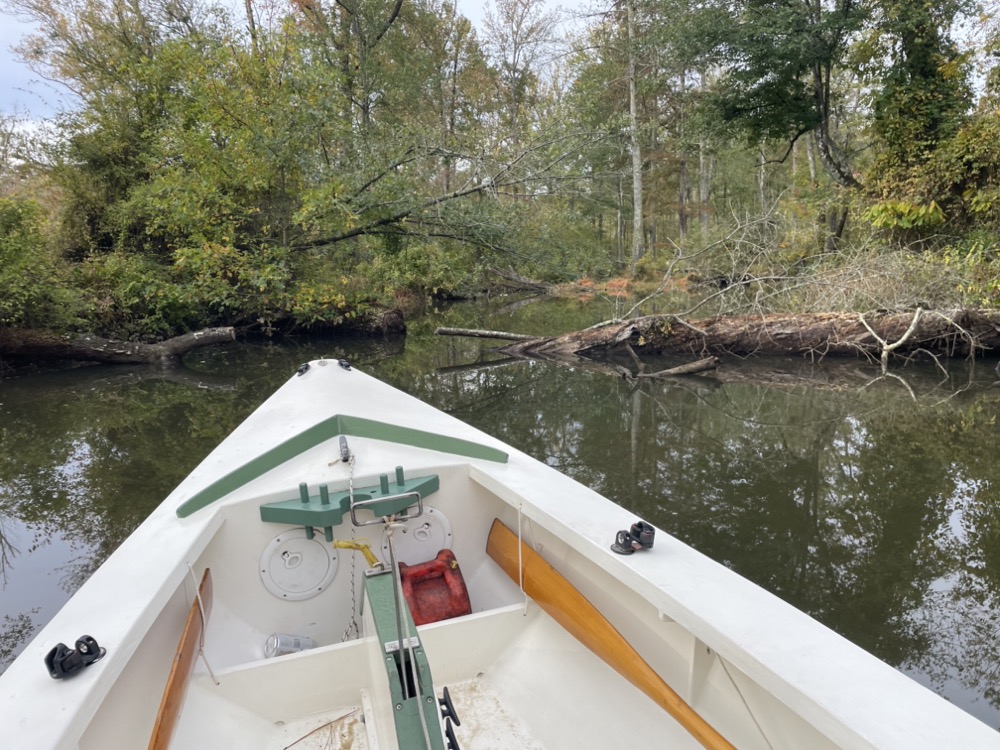
Eventually I ran up on a beaver dam 1/2 a mile further along than last year. I ate lunch and listened to the gurgle of a pretty impressive flow of water. I wonder how or even if the tides affect the water level this far up. Maybe next year I need to pull the boat over the dam and see what’s past the bend!
1/2 mile further from last year’s green track and 1/3 of a mile from Route 17.
Coming back through the tightest spot on the river.
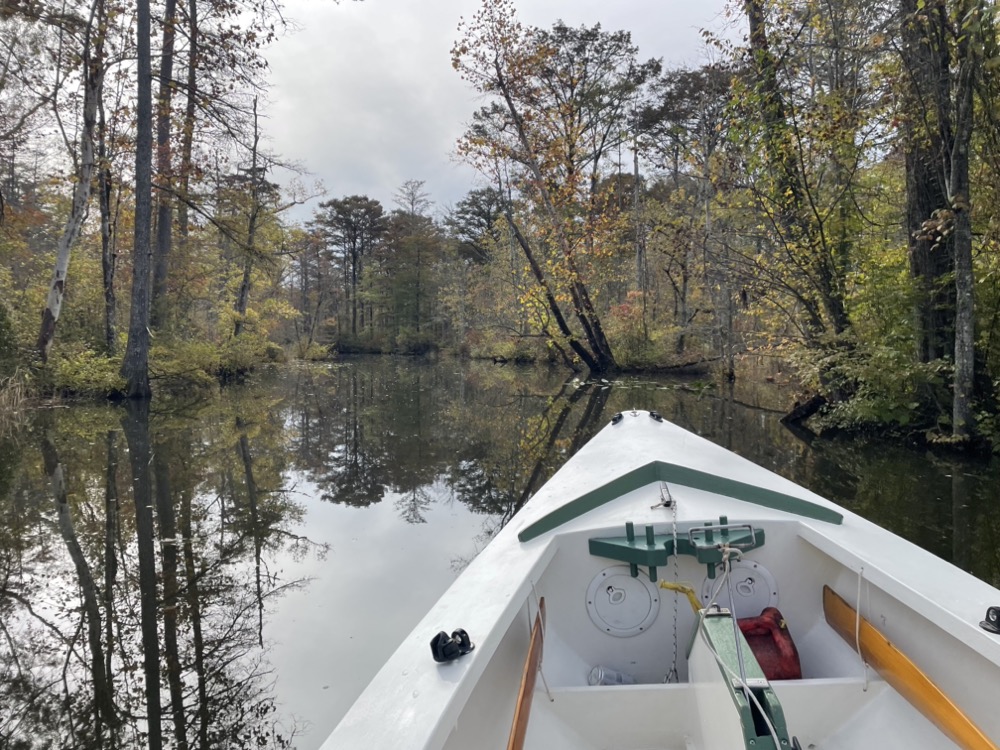
It’s really hard to show how beautiful it is in pictures. I’m sure rowing or an electric motor would be even better since I’m sure there’s a lot of birds to listen to.
Sometimes it was hard to see what was river and what was forrest with all the reflections.
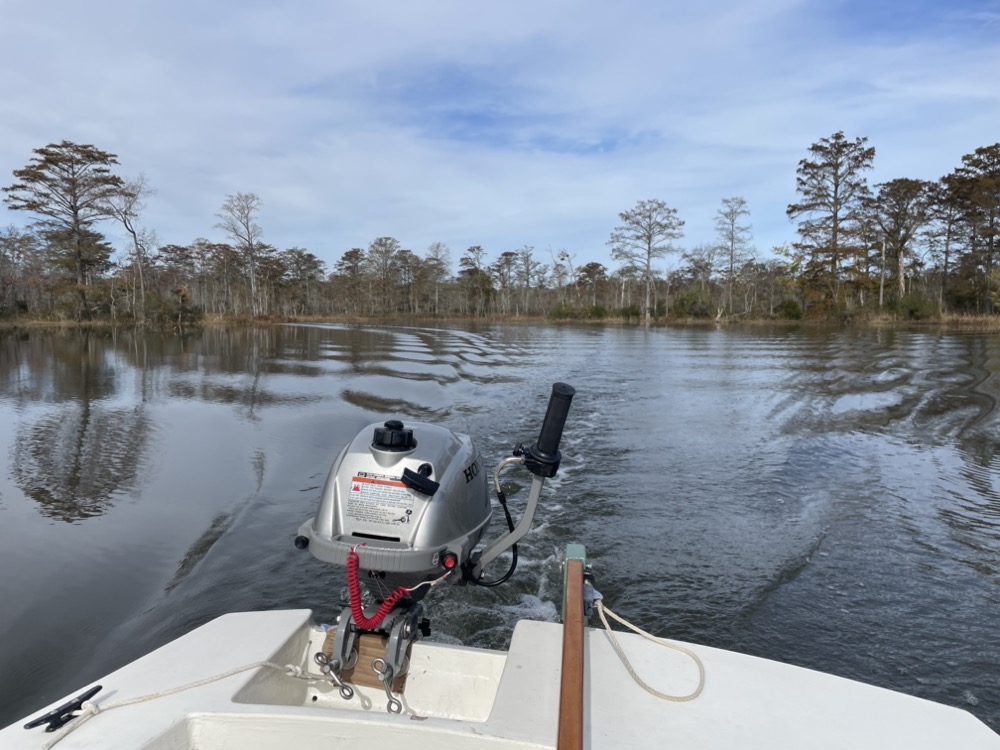
Heading out of the swamp back into the wider river. For whatever reason this trip felt just a touch less awe inspiring than last year. I’ve been wondering if that’s because it wasn’t new and unexplored? Or was it the weather? I guess I’ll have to see how I feel next year! It seems to be becoming a yearly thing.
Back at the ramp at 1pm. I hauled out just after the two guys from Richmond in their jon boat. The day was getting warmer and overall was quite pleasant.
This year I went 29.1 miles in 5 hours 44 minutes. Average speed was 5.3 mph with a max of 6.9 mph. Since the tide was with me this year my fuel mileage was better. I did 10.7 miles on the 1 liter fuel tank at an average of 6 mph, so that works out to 40.5 miles per gallon and .15 gallons per hour.
Next I installed the rudder hardware and made a mockup of the rudder head. I plan to weld it up from aluminum so it will all be one thing instead of building it up from plywood and bolting on the horizontal top that the push/pull rods from the tiller attach to.
Up forward I epoxied a doubler and some 5/8″ fiberglass pipe through the hull that will take a drain line from the mast box. I think the plans call for running it aft through the bulkhead and into the cockpit area, but I figure this will be tidier.
Then I put a big fillet between the bottom and lowest plank, two staggered layers of 12ox fiberglass tape, and then 6oz fiberglass cloth on the inside of the hull.
Here’s the port seat front installed and the top dry fit. The centerboard case makes up the front of the starboard seat.
It seemed like the centerboard case was the next logical thing to make, so I started on that. The edges are white oak and it was a lot of fun fitting everything together.
I wanted to help lock the frames in a little better before cutting the centerboard slot so I put on the next set of stringers. Here I’m scarfing the last foot or so on. The centerboard case is also finished on the inside and glued together. Two paint sticks taped together with a suitable radius worked ok for putting a fillet up inside.
Speaking of finish, I’ve been thinking about how to finish the plywood and especially the parts that will be impossible to get to like the inside of the centerboard case and the water ballast tank. I want this boat to be pretty bombproof so I decided on three coats of epoxy and two coats of Pettit Protect barrier coat. I put a single coat on a sample of plywood and buried it along with a control in the mulch of my wife’s flower bed. After a few months the control was soggy and starting to get soft while the other felt as light as ever and I didn’t see any signs of cracks or swelling. I’ll let them continue to marinate and see what they’re like in a few more months.
Next I cut out the slot for the centerboard case. It gets filleted and tabbed into the hull. I was pretty anxious and procrastinated a lot on my first boat before cutting the slot, but on this time I just measured and went at it with the oscillating saw.
Here’s the case dry fit. I also scribed the seat top to the curve of the stringer and added a 3/8″ doubler around the edge.
Once the case was installed I made a cardboard pattern for the next plank.
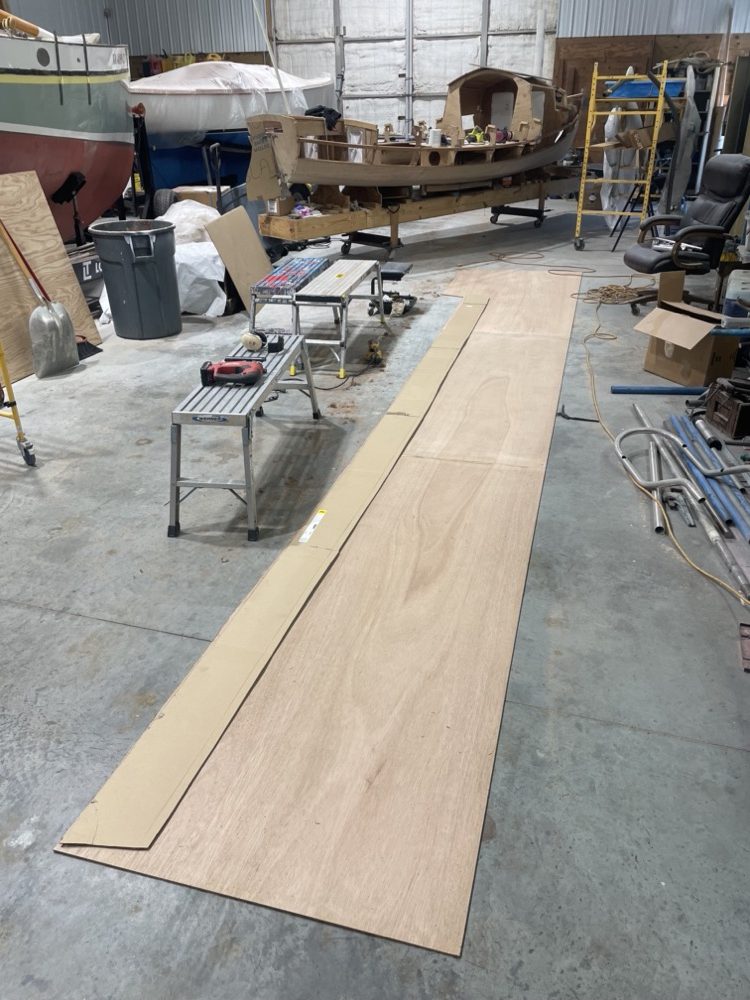
Then I scarfed up a 24′ long sheet of plywood and cut out two planks.
And here they are dry fit. I’m enjoying the height and angle of this plank since I could do all the drilling and screwing while sitting in an old rolling office chair.
And here’s the stringer beveling setup in action. It works really well and so far I’ve been able to avoid hitting any of the screws.
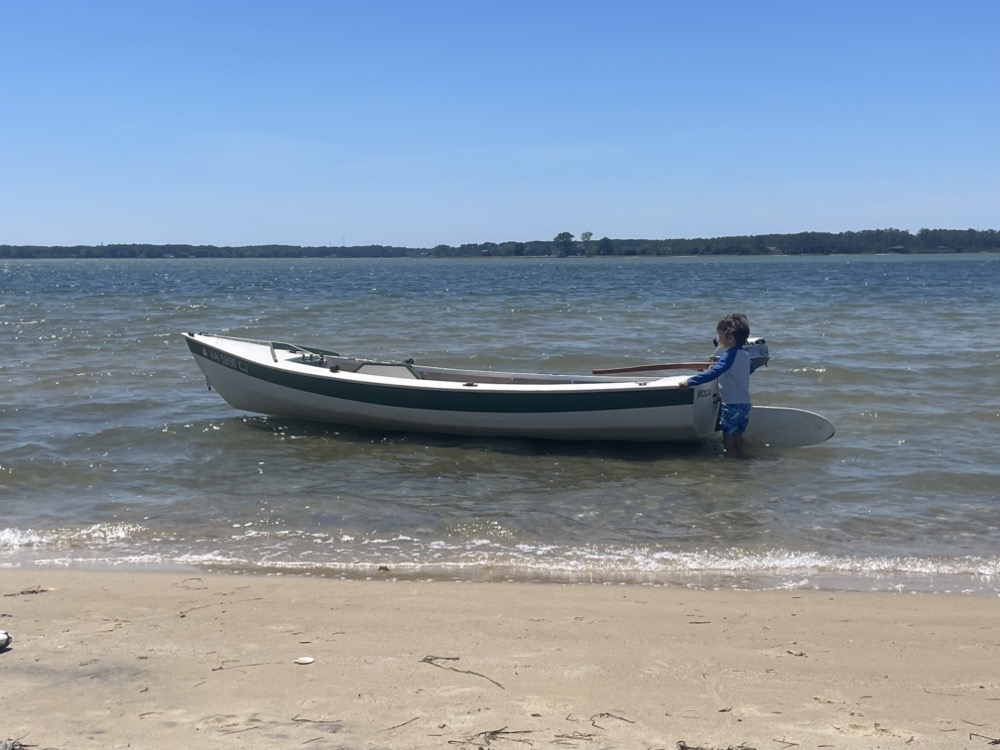
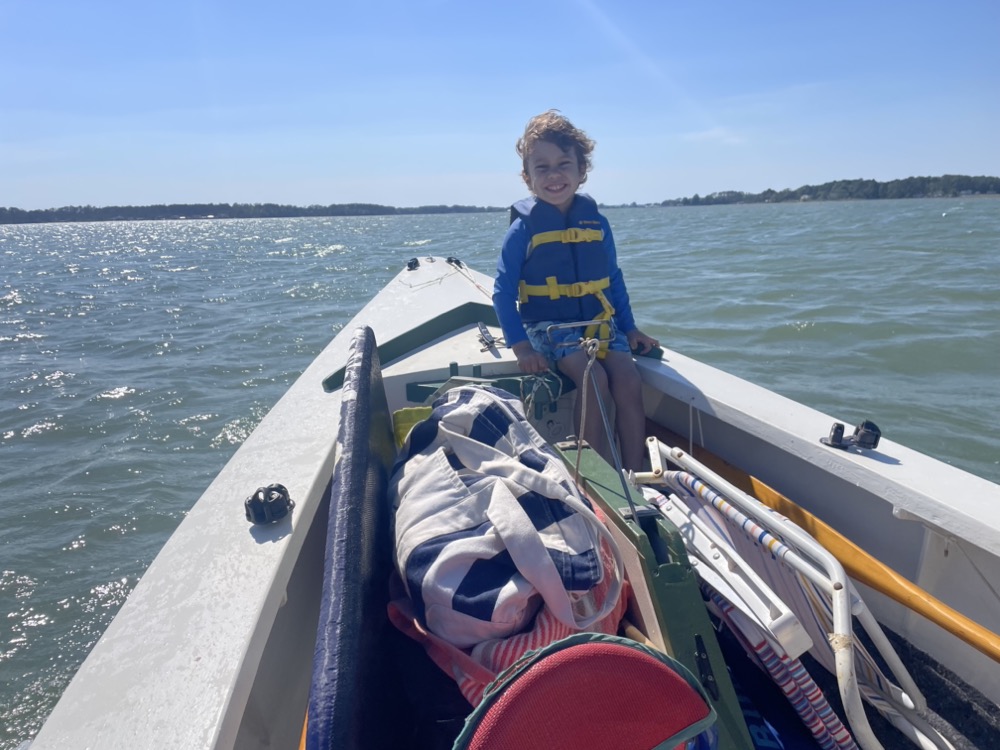
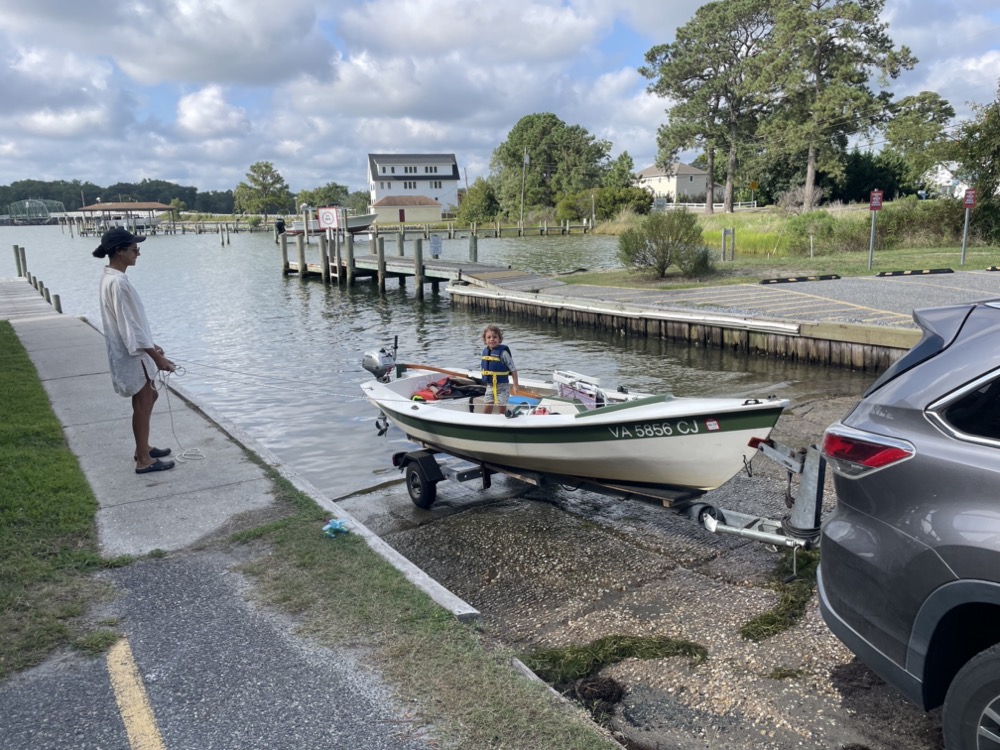
Launching at the public ramp. Henry really likes riding the boat into the water. My stern cleat hitch came loose while I was pulling the boat off the trailer so I tied a bowline on the end and got him to drop it over the cleat. Crisis averted!
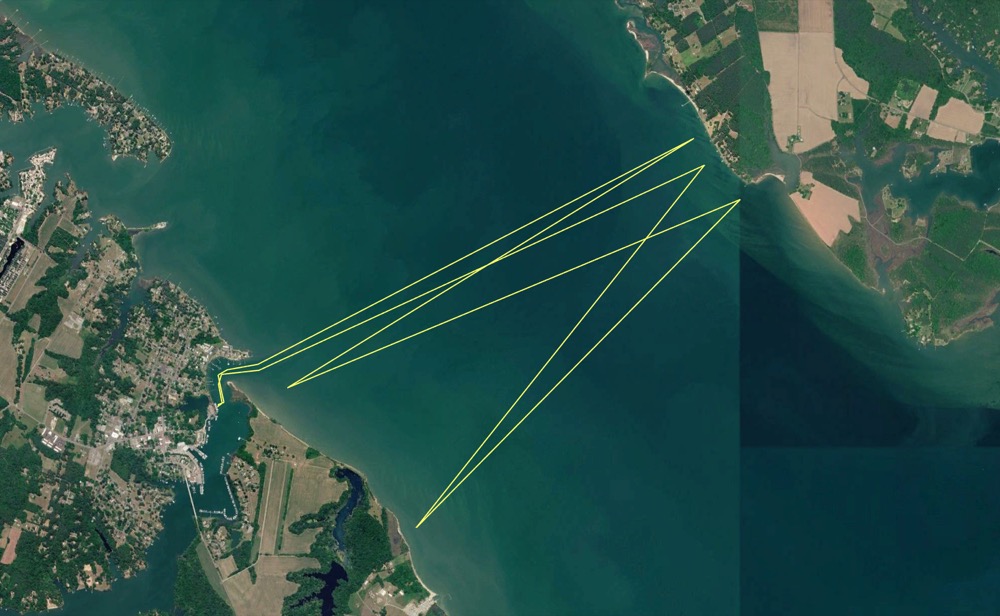
A past GPS track out to the sandbar. It’s about 2.5 miles one way.
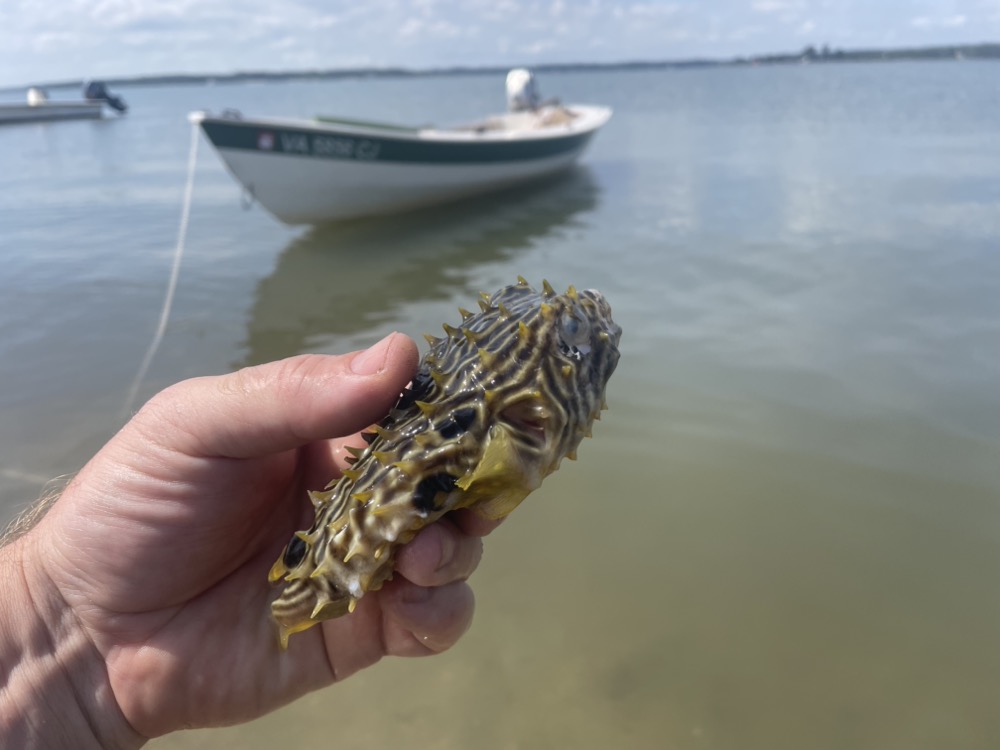
Out at the beach this striped burrfish washed up on shore in front of our tent. I tried to get Henry to hold him but he was “too spiky.” I put him back in the water and he eventually fluttered off. Apparently they’re pretty poor swimmers.
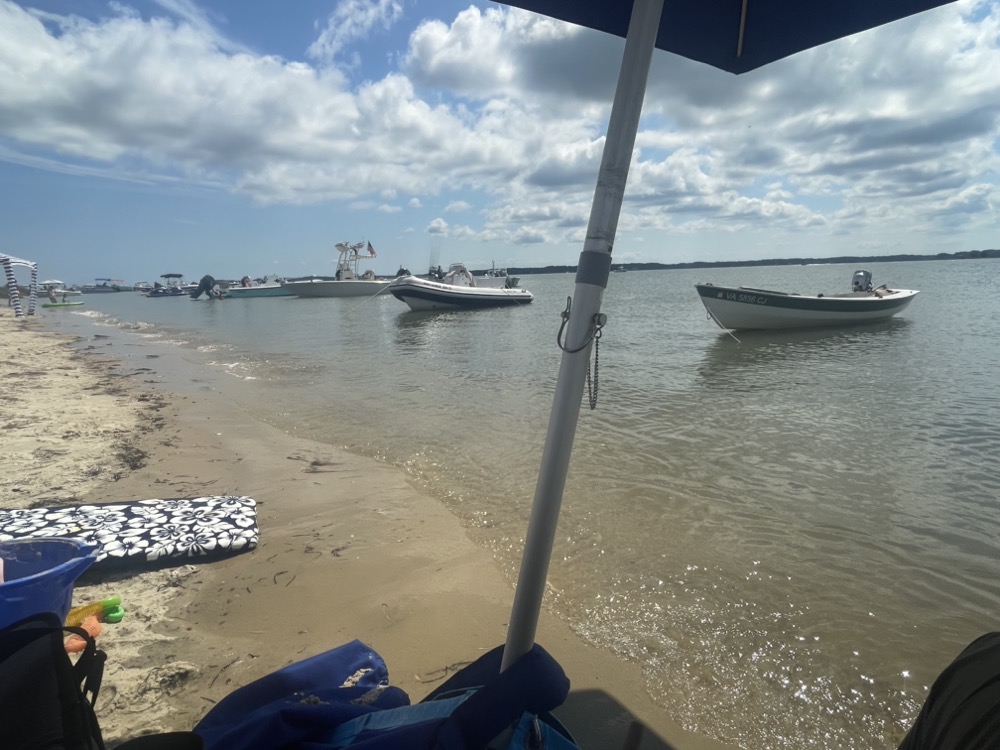
Tons of boats out there! Later the tender (a full blown Boston Whaler) to this guy squeezed in between me and the RIB.
Back at the ramp I’ve found hitting the fuel cutoff lever just before the fake lighthouse will give you about 30 extra seconds of idling at the dock before the carb runs dry. I came in, snagged a piling with the stern line, and settled in against the dock all in one smooth go. Then I had the trailer in the water and the boat out in less than five minutes. Everything went about as well as I could hope for and I didn’t give the patrons at the restaurant anything to laugh at.